 The following is a brief summary of the workflow to publishing content in WordPress. Print this out to remind yourself of each step in the process. Consider this your checklist to review before publishing every post until you become accustomed to the process. This is your guide to the WordPress publishing process.
This guideline is also available as a free PDF file in long form (1.2M PDF) and short checklist (70k PDF).
Please note the following:
- Access to the various features via the WordPress Administration Screens is presented in a series of hovers or clicks such as Settings > General > Tagline, where Settings is the first admin menu item, General is the second, and Tagline is a section found on the resulting screen. In general, the first word in the series is a hover not a click. Repeating the sequence out loud helps to recall where things are in the Admin Screens.
- The WordPress and WordPress.com interface changes more often than many of us prefer in an attempt to improve and evolve. If the image in this guide doesn’t match, follow the names and descriptions of the process. That rarely changes.
- The backend interface of WordPress is called the Administration Panels or Screens and commonly referred to as the backend, admin, admin panels, admin screens, interface, and dashboard. It is only accessible when the user is logged in. Within the Admin Screens are various screens or panels. Many book and site authors refer incorrectly to this complete area as the Dashboard, however the Dashboard is one of many screens on the interface. The Dashboard screen is simply a modular welcome screen that holds information related to the overall activity of your site including the stats.
 The names of WordPress menus change from time to time. There are also many names for the various parts and pieces of WordPress. When possible, alternative names are offered in this guide. Please note the official spelling of posts is with a small “p” and WordPress Pages with a capital “P” to differentiate WordPress Pages from web pages in general.
- This guide adheres to the US and international laws for web accessibility, ensuring all web pages are accessible to everyone regardless of how they access the site through desktop computers to mobile or television devices, or their disability. While the law applies to commercial (any site that sells something or earns money), non-profit, and government agencies, the steps to make your site accessible are few and a good habit to learn. It also makes your site easier to use and read, more search engine friendly, and improves your SEO.
- This process is for publishing via the Administration Screens. You may be using a third-party publishing program or tool or WordPress Theme that permits publishing from the front end of the site, or using the new Editor that WordPress.com is developing, a responsive interface as an alternative to what they are now calling the “Classic” interface. I will be focusing on using the Classic interface, but the process continues to be the same.
- Links to additional information and tutorials come from verified and qualified sources, including my college students’ project, ClarkWP Magazine, their own student-run online magazine writing legacy content to teach themselves and future students how to use WordPress.
- While this list may intimidate you, so did learning to drive a car. Just as a vehicle has many levers, buttons, wheels, and pedals, this process will quickly become second nature. If you leave your site for a while, this guide will provide a refresher course.
The WordPress Publishing Checklist
- Add New Post/Page: To create a new post or Page:
- Go to the following:
- Admin Bar > Publish and choose post or Page
- Admin Panels > Posts or Page > Add New
- On a post or Page, there is an Add New link at the top
- Directly by URL:
http://example.com/wp-admin/post-new.php
- For more specific help, see “How to Add Posts and Pages in WordPress” and “How to Edit a Post or Page.”
- Go to the following:
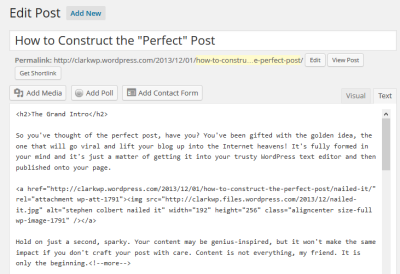 Add the Title: Write the title first.
- If you leave it blank, forget, then publish the article, WordPress will use the post ID number and the post title will be blank.
- Post titles are typically in title capitalization, not lowercase or all caps.
- Post titles are typically short and concise, not a full, long sentence. Title the post well for readers to identify the purpose of the article.
- Post titles rarely include punctuation other than quote marks, question marks, commas, and exclamation points.
- Write the Article: Write the article in the editor. There are two editors in WordPress:
- Visual Editor: The Visual Editor is the most commonly used, and the most troublesome for professional bloggers. It is a WYSIWYM Editor.
- If you are publishing code or something more complicated than simple text, consider using the Text Editor.
- If you choose to copy and paste from a text editor or word processor, remember to paste from the word processor into WordPress using the Text Editor or the Paste from Word option on the second row of the Visual Editor toolbar.
- Text Editor: The Text Editor is used mostly by coders and professional bloggers publishing code in hand-written HTML. See “Writing and Publishing Code in Your WordPress Blog Posts” and “How to Add HTML in a WordPress Blog Post” for more information on using the Text Editor.
- Switching: Switching between the two WordPress editors may cause some code and formatting to change, sometimes breaking the code.
- Remember to pay attention to web browser misspelling indicators, a red squiggly underline, and fix misspellings, and take time to frame and structure the content well for maximum readability.
- Visual Editor: The Visual Editor is the most commonly used, and the most troublesome for professional bloggers. It is a WYSIWYM Editor.
 Add Links: Add links in properly formed HTML links.
- All links are required to have a
titleattribute describing the destination of the link. - Make sure no links are set to open in a new tab or window. This violates US and international laws for web accessibility and frustrates many who know how to use the back button in a browser. If you must force a link to open in a new tab or window, you are required to inform the reader as in this example (link opens in new window).
- If linking to a downloadable or viewable media file (other than an image), you are required to inform the reader in the link, as in this example (PDF).
- Take a moment to link to other posts, Pages, categories, and previous posts to connect thoughts and content together and encourage the reader to dive deeper into your site.
- See this article on creating links in the Visual Editor for help creating a link, and this article on creating and using jump links to create a table of contents or a jump link on a single post or Page.
- All links are required to have a
- Add Headings: If the article calls for it, add headings, section titles, in the content. Headings pull the reader’s eye through the content and improve readability.
- Headings are found on the second row of the Visual Editor toolbar. Click Paragraph to reveal the formatting choices for headings.
- To Add a Heading in the Visual Editor:
- Type the heading text and hit enter to allow it to sit on a single line.
- Select the text and choose the heading size from under the Paragraph drop down styles.
- To Add a Heading in the Text Editor: Headings in the Text Editor are hand coded and featured on their own line. An empty space above and below is recommended.
- Each WordPress Theme’s heading choices in the content area are different. Experiment. In general, start with H2 then H3 and H4. Few Themes design for the smaller headings below H4.
- Headings should not be styled. Do not add bold, links, images, or change the font style or color. Allow the Theme to style the heading.
- Headings should be concise phrases not sentences or paragraphs.
- There is no heading button in the Text Editor. Use the HTML tag for the heading such as
<h2>Section Title</h2>.
 Add Blockquotes and Citations: If you quoted or used content such as images or video that is not your own, ensure the article features proper citations and credits to the source and original copyright holder if possible. There are a variety of techniques. Choose specific styles to maintain consistency.
- Blockquotes are HTML tags wrapped around quoted content to distinguish it from original content. Each Theme designs these differently.
- Quote marks around the quoted text is not necessary. Let the blockquote design frame the cited content.
- Credit links are links to the original source. These may be found within an article, in the blockquote, image caption, or at the bottom of the article.
- Hat Tip links at the bottom of an article are to thank the referring source for the information in the article. The link is to the referring article.
- Please know the rules for Copyright Fair Use and how to cite properly to ensure you are not accused of copyright violations.
 Add Lists: If your article calls for it, add a list to your post. Any time you publish a list, numbered or unnumbered, put it in an HTML list not single lines to emphasize the list and improve readability.
- Lists may feature lists within lists. These are known as nested lists.
- Lists may include links, but rarely do lists feature only images. Use lists for written content.
- Lists are also a creative part of your content. Experiment and have fun with lists.
- Add Images: Add images using the Media Uploader (Add Media, Media, Media Manager) from within the post or Page. Click the Add Media button to access the Media Uploader/Manager.
- Upload the Image: An image must be uploaded to your site before you may use it. To upload an image, you have the following methods:
- On either WordPress Editor, click and drag an image from your computer’s files onto the post or Page. This will add the image to the Media Uploader/Manager.
- Click and drag an image from your computer’s files (not a web page or document) onto the Insert Media overlay on the post or Page
- Click the Insert Media button and choose the Upload Files tab to upload the image through a traditional file uploading process.
- Name and Set the Media Details: Once the image or file is uploaded, look to the right side of the screen to the WordPress Media Details and complete them as instructed below:
- Media Library: The Media Library area of the Media Uploader/Manager features images and files uploaded to the site. Click on an image or file to see its Attachment Details. You may restrict or filter the images on the screen:
 Attachment Details: This area to the right of the Media Library thumbnails contains the details about the image that must be filled in selectively.
- URL: This is the direct address to the file. If you will be putting the file in a Text Widget later, this is how to access the file address for the image or file.
- Title: Required by WordPress, this information is stored in the database along with a link to the actual file.
- The title is the name of the image, not necessarily the description. WordPress automatically uses the file name. You may change this to something more descriptive and appropriate. Think of the title as the name of the artwork like “The Mona Lisa by Da Vinci.”
- If the image is set as an attachment, clicking the link will generate a new web page featuring the image with the title featured as the web page title.
- Caption: If desired, the caption is to be set here. In general, captions are necessary if the image requires explanation to the reader or features specific people and locations that must be identified as part of the purpose of the article.
- Alt Text: Required by US and international laws for web accessibility for all commercial, non-profit, and government websites.
- The Alt Text is the alternative text, words that describe the image to those with vision impairment.
- It is a short sentence that should start with a capital letter and end with a period that describes what the image looks like such as “Children playing on beach silhouetted against setting sun.” or “Children playing in the sand on beach in Manzanita, Oregon, silhouetted against the bright orange sunset.”
- Web browsers display the Alt Text as a hover balloon tip or in the status bar when hovering over the image.
- WordPress displays the Alt Text as a subtitle on attachment pages.
- Description: The Description is optional and rarely necessary. It is used to explain in greater detail the description of the image such as a chart, graph, or complex image. WordPress automatically generates a text file storing this information that is read by screen readers, and displays the description as the post content on attachment pages.
- Attachment Display Settings: This area below the Attachment Details is the most important area as it sets how the media is to be displayed on the web page.
- Alignment: This sets the image to float to the right, left, or center with the text wrapping around the image, or none, in which case the image sits there on the same line as the text or on its own line.
- Link To: if the media is to be wrapped in a link, this is where that information is set. There are several options:
- None: No link will be placed around the image.
- Media File: This is for downloadable files such as PDF, docs, spreadsheets, text files, MP3, etc. Avoid using this option with images. If used with images, a click on the image in the post or Page will take the reader to a blank web page with only that image, no site navigation, branding, or design.
- Attachment Page: Use this one for all images, especially those that are resized on the post or Page. The reader will click the image to be taken to a new page featuring the title, image, Alt Text, and description (if available) within the WordPress Theme where people may comment on the image. It literally generates a new web page on your site, opening up more opportunities for interactivity and SEO.
- Custom URL: If you wish the file or image to direct the reader to a web page or website on or off your site, place the URL/Address here. This is ideal for calls-to-action images and badges.
- Size: This sets the size of the image as displayed within the content.
- Image Management Guidelines: The general guidelines for images are:
- All images are set as Attachments.
- Ensure all images comply with web standards, named properly as “Steve and Sally playing in the swimming pool.jpg” not 43569807.jpg.
- In general, image files are to be optimized to no larger than 150K in file size, smaller is better (except for photography sites).
- In general, image files are to be sized no wider than 1500 pixels if they are to be centered and displayed full-width. Smaller is better for all other images.
- If the image is 60% or less the width of the content column, set the image aligned to the right or left with the text wrapping around.
- If the image is 60% or more the width of the content column, set the image size to full and the alignment to center. Ensure that centered image fill the width of the content column.
- Ensure media behaves per reader expectation. Clicked images should either show the reader a larger version of the image (in an attachment preferred) or take them to a new web page or site, and the image should clearly indicate which action will occur. Downloadable media files should feature descriptive anchor text (visible words) to indicate it is a downloadable file with instructions on how to download the file.
- For more information, see “How to Add Images in Your Post Content.”
- Upload the Image: An image must be uploaded to your site before you may use it. To upload an image, you have the following methods:
- Add Video: if the article needs video, see this tutorial on how to embed videos into WordPress.com. Note that original video created by the author is required to feature notes or transcript (and captions) on the post.
- Set the Excerpt: Locate a spot about one to three paragraphs into the article and place the MORE feature in between paragraphs or at the end of a paragraph to set the excerpt point.
- The MORE excerpt allows only the excerpt to be seen on the front page of the site and multiple post pageviews, saving readers from scrolling and scrolling down past your post to the other posts.
- Posts that are 2-5 short paragraphs in length do not need to use the More feature.
- Posts with images within the excerpt area should have the image fit above the cut-off point rather than close to it to avoid strange looking post excerpts on multiple post pageviews.
- Select Categories (Posts): Place the post in the most appropriate and related category on the site.
- Categories may have subcategories. Check both the parent and child category for the post.
- A well-developed site may have 5-12 categories not including sub-categories.
- A post may be placed in more than one category and always its parent category. Choose categories carefully. Not every post deserves to be in every category.
 Add Tags: In the tag module, type in the tags for the post separated by commas. Click ADD to add the tags to the post.
- You may use one word or a short phrase, usually no more than 4 words, all in lower case. If you choose title caps, do so consistently.
- Use common words people would use to find this information. These are keywords, words people will search to find the article. Think of them as index words for your site, or micro navigation.
- WordPress will offer auto-suggestions based upon previously entered tags. Select the tag from the list to add it to your list.
- If you add a tag that isn’t right, or spelled wrong, click the X next to the tag to remove it from the post.
- You may edit tags through Posts > Tags.
- How many tags do you need? In general, enough to help you catalog the content, however if you are on WordPress.com, they recommend no more than 15 as they restrict posts with more from the WordPress.com Reader.
- Add the Featured Image: If the WordPress Theme or your site project calls for it, add a featured image. Look for the Featured Image module on the edit post panel and add an image.
- The Featured Image may be an image from within the post or an newly uploaded image representative of the post content.
- Each WordPress Theme may have specific size requirements and display feature images distinctively, so check and note that information down on this list.
- Save as Draft: Save the post. This sends the information to the database to preserve it until you make changes. While WordPress auto-saves, don’t rely exclusively on it. Save frequently, especially before previewing the post to ensure you are seeing the latest version.
- Preview Post: Preview the post following instructions above to ensure the post looks the way you want it and that there are no errors. Switch back to the browser tab upon which you are editing the post to make changes. Save as Draft, then switch to the post preview tab and refresh the page to see the changes.
 Set Publish Options: Depending upon the needs of the author, client, or site, set the Publish options for Visibility as public, private, or sticky post.
- If the post is to be published in the future, set the Published On date and time.
- If the post is to be “stuck” to the front page of the site, locked in place, choose Sticky Post. To unstick a post, uncheck the box. Note: Some Themes use sticky posts to add images to the slider on the front page or present the post on the front page of the site distinctively from other content.
- If the post is private, it will only be visible to registered and logged in readers of the site.
- Pre-Publish Tips: Before you run through the final check list, note the following guidelines and tips for web publishing:
- Do Not Style the Content: Do not change fonts, font colors, font sizes, etc., or force styling on the content unless absolutely necessary to convey a point or directions. Such modifications should be done through the Theme’s stylesheet. This protects the content in the future if you decide to change Themes or styles. This also reduces the amount of work and things to remember to do every time you publish.
- Use Short Paragraphs: The general rule of thumb is one idea or point per paragraph. In traditional writing, a paragraph may go for many page turns. On the web, readability is increased with whitespace, empty space on a page.
- Bold and Italic Abuse: Restrict bolds to emphasis on specific points, like found in this guide, and instructions. Do not use bolds for heading replacement or on words that have nothing to do but emphasize something. It makes it hard to read. Same with italic. Italic is reserved for book titles, air quotes (if necessary), foreign words, and emphasis on instructions in general.
- CAPS: All caps is reserved for SHOUTING. BOLD AND CAPS IS SCREAMING. BOLD AND CAPS AND ITALIC IS INSANE.
- No Link Dumps: A link dump is a link dumped right into the post content like http://lorelle.wordpress.com/2006/04/10/what-do-you-do-when-someone-steals-your-content/ and is horrible to read. Use properly formed HTML links to improve readability.
- Get to the Point: Search engines may scan and index your entire post, but display only the first 100 words. Make the first 100 count.
- Nouns not Pronouns: Use nouns not pronouns to convey your point. It is a wonderful things when you write about it, search engines get it, and people understand what it is that you are talking about.
- Make Images Matter: Include screenshots, graphics, and images that support your post content not just provide eye candy entertainment.
- Last Check Then Publish: Ensure you have added the title, more, categories, and tags. Check that all images are set as attachments, aligned properly, and feature titles and alternative descriptions as required in this class and by law. Take a last look at the preview of the post to ensure it meets the criteria of the assignment. If it does, hit Publish.
Note that many web designers and developers create a similar workflow list as a checklist for their clients to help them remember each step in the web publishing process. Consider creating your own with your own notes to add to your client or site worksheets. Each workflow list would be customized based upon the author’s needs and the WordPress Theme they are using.
You are permitted to print and share this guide for educational purposes only.









6 Comments
Thanks for this checklist, Lorelle!
You are welcome, Hans. Thank you.
Wow, so many opportunities with WordPress to violate laws and go to prison.
LOL! Web accessibility violations do not result in a prison term, but they can result in federal fines up to $100,000 in the United States, and civil fines that could result in millions, as many businesses have suffered in the United States and globally. Like speeding, the law is the law, doesn’t mean that people obey it. Some people feel that web accessibility in the United States should actually be more stringent like it is in other countries, allowing equal access to all via all devices. Web accessibility isn’t just for the “disabled” for for the abled using smartphones, televisions, and all types of devices to connect to the web.
And these laws have nothing to do with WordPress. WordPress by default actually makes compliance difficult, though there is an accessibility work group improving the accessibility of WordPress for all.
Hi, I am new to wordpress just started 3 days ago but seem to be doing a reasonable job. I was able to post a full width picture on my front page and am happy with it but on my about page it seems no matter what I do the background picture will not go full width Can anybody suggest what I might be doing wrong? I just want the Yosemite picture to stretch all the way across
This isn’t the place to ask for general WordPress.com or WordPress.org help, but I’ll do my best. A question like this needs to go to the WordPress Support Forums.
A background image is different from an image embedded into a post or Page. Not sure what you are doing, but the background image is set in the Theme settings and must be the width you need in order to fit the width you need. If the image is in a post or Page, edit the image and set the Attachment Details to full width and ensure that the image width is appropriate to fill the width of the content column.
82 Trackbacks/Pingbacks
[…] https://lorelle.wordpress.com/2015/01/12/wordpress-publishing-checklist/ […]
[…] WordPress Publishing Checklist […]
[…] WordPress Publishing Checklist […]
[…] WordPress Publishing Checklist […]
[…] WordPress Publishing Checklist […]
[…] WordPress Publishing Checklist […]
[…] WordPress Publishing Checklist […]
[…] WordPress Publishing Checklist […]
[…] WordPress Publishing Checklist […]
[…] WordPress Publishing Checklist […]
[…] WordPress Publishing Checklist […]
[…] WordPress Publishing Checklist […]
[…] WordPress Publishing Checklist […]
[…] WordPress Publishing Checklist printed and by your side through the […]
[…] WordPress Publishing Checklist […]
[…] WordPress Publishing Checklist […]
[…] WordPress Publishing Checklist […]
[…] WordPress Publishing Checklist […]
[…] WordPress Publishing Checklist […]
[…] WordPress Publishing Checklist […]
[…] the WordPress Publishing Checklist you were provided some image specifications. Here they are again with more specific […]
[…] WordPress Publishing Checklist […]
[…] information was highlighted in the WordPress Publishing Checklist and elsewhere in this course and the 60% guidelines for images has withstood the test of time in […]
[…] WordPress Publishing Checklist […]
[…] WordPress Publishing Checklist […]
[…] WordPress Publishing Checklist […]
[…] just avoid doing it in the first place. This is why I highly recommend working directly from the WordPress Publishing Checklist for the first few weeks or so of WordPress use until you learn to check all the little details […]
[…] WordPress Publishing Checklist […]
[…] WordPress Publishing Checklist […]
[…] WordPress Publishing Checklist […]
[…] WordPress Publishing Checklist […]
[…] WordPress Publishing Checklist […]
[…] WordPress Publishing Checklist […]
[…] WordPress Publishing Checklist […]
[…] WordPress Publishing Checklist […]
[…] steps are explained further in the tutorial on links and the WordPress Publishing Checklist to help you […]
[…] WordPress Publishing Checklist […]
[…] WordPress Publishing Checklist […]
[…] WordPress Publishing Checklist […]
[…] WordPress Publishing Checklist […]
[…] WordPress Publishing Checklist […]
[…] WordPress Publishing Checklist […]
[…] WordPress Publishing Checklist […]
[…] WordPress Publishing Checklist […]
[…] WordPress Publishing Checklist […]
[…] WordPress Publishing Checklist […]
[…] WordPress Publishing Checklist […]
[…] WordPress Publishing Checklist […]
[…] WordPress Publishing Checklist […]
[…] WordPress Publishing Checklist […]
[…] WordPress Publishing Checklist […]
[…] WordPress Publishing Checklist […]
[…] WordPress Publishing Checklist […]
[…] WordPress Publishing Checklist […]
[…] WordPress Publishing Checklist […]
[…] WordPress Publishing Checklist […]
[…] WordPress Publishing Checklist […]
[…] WordPress Publishing Checklist […]
[…] WordPress Publishing Checklist […]
[…] WordPress Publishing Checklist […]
[…] WordPress Publishing Checklist […]
[…] tänka på när det gäller bloggandet. Jag har tidigare skrivit ett inlägg om att jag hittade en checklista som man skulle använda sig av när man skriver ett WordPressinlägg. Jag har också skrivit ett […]
[…] WordPress Publishing Checklist […]
[…] kommit över en checklista att följa om man vill publicera det perfekta inlägget i WordPress. Denna checklista är skriven […]
[…] WordPress Publishing Checklist […]
[…] WordPress Publishing Checklist […]
[…] WordPress Publishing Checklist […]
[…] WordPress Publishing Checklist […]
[…] WordPress Publishing Checklist […]
[…] WordPress Publishing Checklist […]
[…] delvis så bygger dessa punkter på en checklista som Lorelle har publicerat för en tid sedan. Men jag har kryddat upp den med egna tankar och egna […]
[…] skrivit om en checklista till WordPress som den kunniga (åtminstone när det gäller WordPress) Lorelle har släppt. En checklista som tar upp allt det man bör tänka på när man skriver ett inlägg […]
[…] WordPress Publishing Checklist […]
[…] WordPress Publishing Checklist […]
[…] WordPress Publishing Checklist […]
[…] kommit över en checklista att följa om man vill publicera det perfekta inlägget i WordPress. Denna checklista är skriven […]
[…] WordPress Publishing Checklist […]
[…] WordPress Publishing Checklist […]
[…] WordPress Publishing Checklist […]
[…] tänka på när det gäller bloggandet. Jag har tidigare skrivit ett inlägg om att jag hittade en checklista som man skulle använda sig av när man skriver ett WordPressinlägg. Jag har också skrivit ett […]
[…] WordPress Publishing Checklist […]
[…] WordPress Publishing Checklist […]