![]() In the first article in this mini-series on learning how to create images for WordPress header art, call-to-action images, and add text to images for your site’s design elements, I covered the basic tools and materials you will need for these tutorials.
In the first article in this mini-series on learning how to create images for WordPress header art, call-to-action images, and add text to images for your site’s design elements, I covered the basic tools and materials you will need for these tutorials.
In this tutorial, you will learn simple basics for header art, specifically how to create your own custom header art image and how to use an existing image or photograph and add text to the header image.
You will need to know the recommended width and height for your header art image. For the second part of this tutorial, you will need one or more images such as photographs, graphics, logos, branding, or other design elements.
To create an image from scratch requires imagination and experimentation. You could draw pictures, scribble, or do whatever your graphic arts skills permit.
Creating an Original Custom Header Art
Notes On Pixlr
 Pixlr is a fairly powerful free online image editing and creation tool. It is built in Adobe Flash and requires the Flash Plugin activated on your web browser or mobile app.
You have the ability to add layers and use many features found on graphic software programs, but it is a bit tedious to use as it requires precise series of actions to make things happen.
For instance, you cannot just click on a design or image on a layer without selecting the layer first. To move text or images, while you may do so while working on them, you need to click the Move tool to move things. You must click some tools repeatedly to use them in series.
Be patient and experiment. Pay close attention to the Layers and History to note where you are and the actions you have implemented.
In this example, I will create header art from scratch on Pixlr and add text for the name of the site.
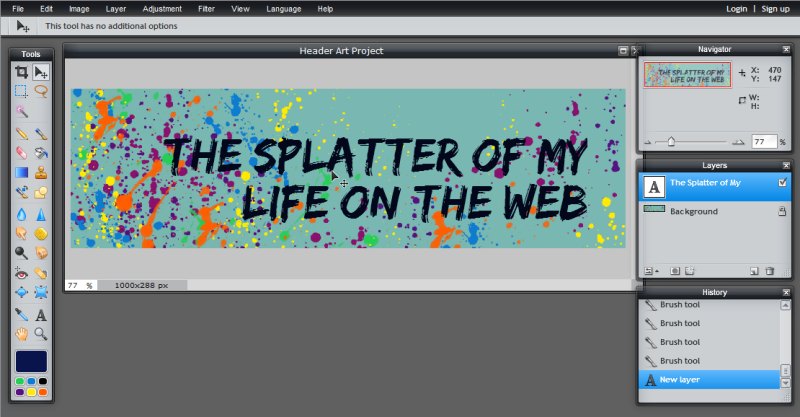
I wanted to keep this original header art project simple, so I came up with a site title, “The Splatter of My Life on the Web.” The site title influences your artistic decisions and what could be easier than a little spilled paint to represent this test site’s header art.
Begin by determining the size recommendations for the WordPress Theme. You should still be using the Twenty-Eleven WordPress Theme. The size recommendations for the header art is at least 1000 pixels width, 288 pixels height.

In the Pixlr Editor, go to File > New or choose Create a New Image from the opening menu.

The New File menu offers a variety of template sizes to help you get started. Choose one close to the desired width and height, then adjust to your desired settings.

In this case, 1000 x 288 pixels for our original custom header art.

Click Okay and Pixlr will display the blank canvas.
You may resize the image screen section to meet the needs of the width of the image by clicking and dragging the lower right corner. You may also move the various modular menu options on the screen like the Tools, Navigator, Layers, and History.
Zoom in or out and adjust the screen to maximize your working space.
Now take a moment to inspect the working area.

At the top is a row of familiar menu options including File, Edit, Image, Layer, etc., ending in the famous Help menu.
Below the menu is a status bar. It will alert you as to the tool selected and offer options to customize the tool as well as error messages.
To the left is the Tools section. Hover over each one to see the name of each tool. Click on them to activate them. If the tool has customizable options, they will appear on the status bar below the main file navigation bar.
On the bottom of the image is the image dimensions and a zoom percentage count.
To the left is the Navigator for zooming and positioning, Layers for vector and raster layers, and below that is History that tracks each step in the process, allowing you to move back and forth within the actions and undo them.
In the bottom of the Tools menu is a color setting area.

Click on the large color swatch and the color wheel will appear. Set the first color of choice. It may be any color until you have a feel for what you wish to do.

Once chosen, if you then click on one of the smaller color swatches, the main color will switch to that swatch, preserved for when you need it. Continue to add colors if you wish. I added some basic colors then added more as I went along with my header art experiment.
You may leave the background white or change it. I wanted it to be a soft green-bluish pastel.
To change it, choose the color, click the Fill Tool, a paint bucket, and click the canvas.

To add color and paint the canvas, set a color then choose the Paintbrush Tool.

The Paintbrush Tool does more than just paint on the canvas. You have the ability to select a design element and stamp it onto the image.
The default design options are nice, but I wanted splatter. Click on the MORE and scroll down the drop down menu to find more options and click Add to add them to your paintbrush options.
Pixlr doesn’t add all the paintbrush options as you may not need them and they do take some memory power in the browser to store.

I found some splatter effects and added them.
I clicked on the various choices, then moved my mouse out over the canvas to see the size and outline of the shape of the splatter effect until I found one I liked. Use the slider labeled Diameter to set the size of the paintbrush shape.

With purple, I stamped the paintbrush on the canvas.
Note that on the status bar above, you can change brushes, adjust the opacity, and select from three different effects. Click the Brush item to adjust the diameter and spacing for the image if necessary.

I continued with different splatter brushes in other colors.

It was trial and error, just experimenting with different splatter brushes and colors to see what would happen. I left the upper right area clear for the text I would add next.
With some orange, yellow, green, and blue splatters, I thought I’d splattered enough.

It was time to add text to my original header art.
Click on the A for the Text Tool. Click on the canvas to start adding text.
Type in the text. Note that the text will not not automatically wrap. You must hit the ENTER key where you wish line breaks to appear. Also, don’t try to put all the text into one text area. If you need to control the spacing and positioning of different text, create each one on its own layer.

Don’t like the color, you can easily change it by clicking the color option in the Text Menu.

Choosing a font is challenging. Pixlr loads the fonts from your computer not from their own collection, so you are limited to your fonts. Don’t have the right font, there are many sites offering free downloadable fonts on the web.
Tip: To test various fonts, set the size and spacing of the words so you can easily see them and move the Text dialogue menu box out of the way. Click on the font drop down and move up and down with the arrow keys to watch the fonts change as you move through the list. The scroll jumps up and down the list and arrows offer finer navigation.
When you find a font that works with the image you’ve created, select it. Adjust the font size, style, and color. You may even change the alignment to left, right, or center.

If you click away from the Text menu or wish to change the font later:
- In the Layer module, select the layer with the text you wish to change
- Click the Move tool to move the image around on the canvas
- Click the Type tool and carefully click the text you wish to change to bring up the Text box. If it doesn’t show the words in the Text box, click Okay, and try again.
- Change the text, font, and other styles and click Okay to save the changes
Just remember that you must have that layer selected in order to make changes on it.
The History module tracks each of your actions on the canvas. Wish to go back, click the action further back on the list. Wish to undo your attempts, click on the previous action or use CTRL/CMD+Z to undo.
You may undo your actions as far back as the History tracks.

I moved the text around and experimented with different positions until I was satisfied.
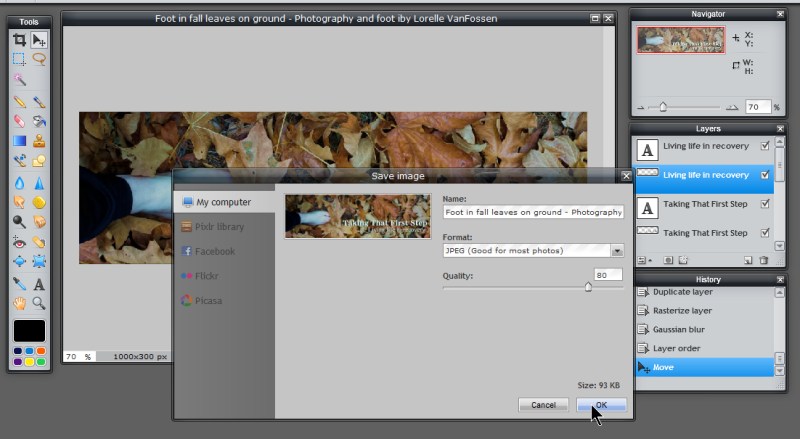
It’s time to save the image for uploading to WordPress.
Choose File > Save in the menu.

The save menu gives you many options.
You may save to your computer’s hard drive, recommended, or save to your Pixlr library (requires registration), Facebook, Flickr, or Picasa (associated with Google+). Choose to save to your hard drive.
Type in the name if you wish to change it from your first attempt. Be very specific with the image title and use spaces not underlines in the file name if necessary.

The Format could be JPEG or PNG as this image isn’t a photograph and doesn’t demand high color resolution. I clicked between the two and the file size changed at the bottom to give me an idea as to the final file size.
If you choose JPEG, you have the option to set the Quality of the image. This graphic editor takes the image at 100% top quality and optimizes (reduces) it down from there. 80% is a 20% reduction, and 20% is an 80% reduction. The lower the number, the poorer the quality of the image resolution.

The final result?

This is now ready to upload as header art for the site.
Creating Header Art with Photograph and Text
There are many ways to add text to a photograph and customize it as header art. The image may cover the whole header image area or a section.

Again, check the header art recommendations from the Theme. Know where the image you wish to use is stored on your computer.
In Pixlr, choose Open image from computer.

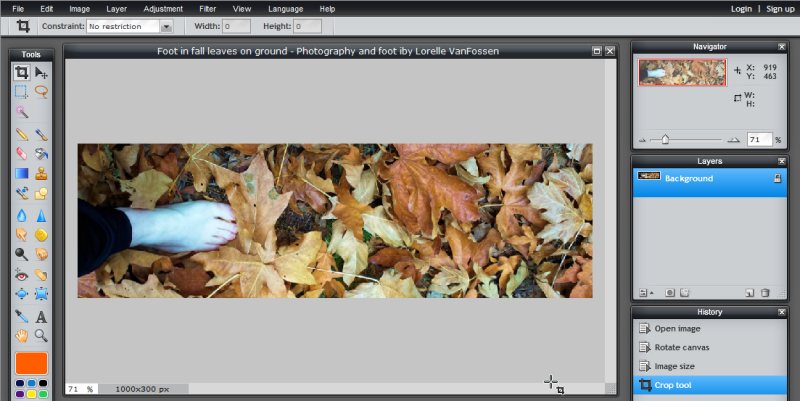
I’ve chosen an image of my foot stepping into a pile of leaves in autumn.
The image is vertical. The header art image is horizontal.
To rotate the image in Pixlr, select Image > Rotate Canvas and rotate in the direction you wish.

With the image laying in the right direction for my header art, notice the image dimensions are larger than I need for the header art, which is good, but I need to resize the image or crop it to meet the header art dimensions of the WordPress Theme.

I’ve decided to do a two step process to change the size of my photograph to meet the header art size.
First, I’m going to resize the image width to 1000 pixels, the recommended header image width.
Go to File > Image Size and set the width, not the height, of the image. If Constrain proportions is checked, the height will automatically adjust.

With the image set to the right width, I’m going to crop the image to the 288 pixel height.
Select the Crop tool and draw a box around the area you wish to crop. A grid will appear across the image.

In the Status bar above, you can type in the 1000 width and 288 height, then click and drag the grid crop box to the right position across the image.
When ready, click the Crop Tool again. A dialog menu will appear asking if you wish to apply changes or not. If you are happy with your positioning, select yes.

The image is now sized to match the Theme’s header requirements and ready to start adding text or changing the look and feel of the photograph.
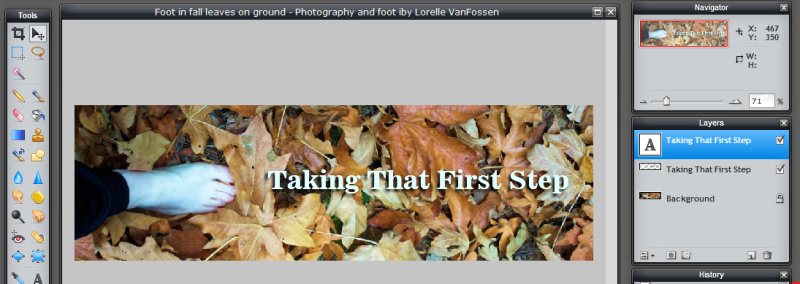
Let’s start with adding the text.
Select the Type Tool and follow the instructions from the previous example to set the font.
I experimented with different colors for the font. If you select the Color option, a color chart appears, but you can also move your cursor over the image and hold down the CTRL/CMD key and the cursor will become a dropper. Holding down the key, click on the image to select the color in that spot. Not happy, move around selecting other colors until you find one right or close. Once selected, release the CTRL key and you may adjust the brightness and tone of the selected color in the color tool.
I decided to stay simple and go with white as I wanted the words to stand out from the leaves in the background.

It was a good idea, but didn’t quite work. The white text is still lost in the image. I decided to create a shadow behind the letters to make them stand out.
Most graphic programs offer a one click feature to add a shadow to text or graphics. I experimented with the built in shadow effect on Pixlr and was unhappy with the result. To use it, select the layer with the text you wish to create the shadow from. Go to Layers > Layer Styles > Dropdown Shadow.
I decided to create one manually to have more granular control over the shadow.
- Click on the layer with the text you wish to create a shadow
- Go to Layer > Duplicate Layer
- Select the Type tool and select and edit the new layered text and move the text layer away from the other text so you can work with it.

- Select the words and change the color to black or a lighter dark tone

- Click Okay to set the changes
- Go to Layer > Rasterize Layer. To add a filter effect, the layer must be raster not vector.

- Go to Filter > Gaussian Blur

- In the resulting dialog box, experiment with the amount of blur with the slider and click Okay when ready

- Select the Move tool and click on the blurred text to move it around to position it. You may end up on top of the other layer of letters. Simply click and drag the layer in the Layer box below the unblurred text layer.

This may take some time and experimentation to align the shadow layer behind the words to make them appear to float over the image underneath.
I still wasn’t happy with the way the words were still a bit lost on the busy photograph. It was time to experiment.
I clicked on the image layer (background) and played around with filter effects in Pixlr.
This is the sepia effect.

This was lovely but not quite right.
I used the Adjustment menu to darken the image using the Brightness and Contrast.

Closer but a little too intense.
What I wanted was to screen the image back so it was slightly darker, pushing it back into a recessed effect, allowing the white of the letters to jump out more.
I added a new layer. Once added, on the Layer modular menu, I moved the new layer between the text and the photograph.

Using the Fill tool, I selected black as the color and set the opacity of the Fill tool to 11%, barely visible, but enough to do the job. It took some experimenting with the opacity and undoing the fill to find that was the right amount.

I was now happy with the image and text overlay. It was time to add the tagline.
Using the Type tool, I added the tagline “Living life in recovery.”

Just as I did with the site title text, I created a shadow layer under the tagline to emphasize it. It was now ready for saving. I saved it as a JPEG, experimenting with the optimization to keep the file size low while maintaining a good resolution and detail in the image.
The end result of all that work and tweaking?
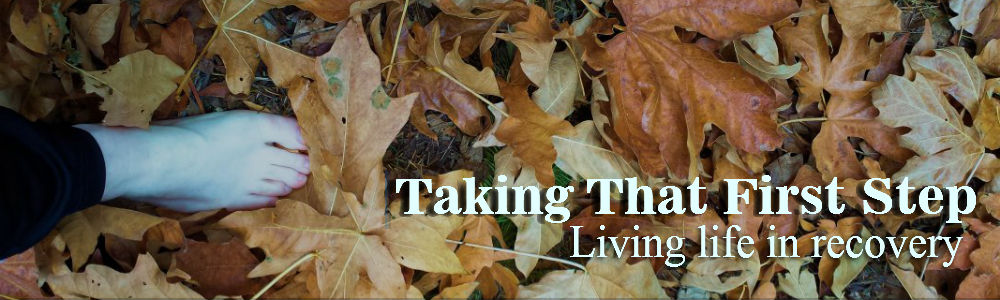
A nice visual that supports the purpose of the site.
Assignment
 These tutorials are designed to create experimental images for your site. It’s up to you to use them or just learn from the process.
Your assignment is to experiment with these different methods and, if desired, change the header art on your test site.
If you choose to use the images you create in these tutorials, please find the appropriate assignment post on our WordPress School Google+ Community and describe your experience and post a link to the post, or comment below with a properly formed HTML links so other participants can see what fun you are up to in this course.
The next tutorial in this series will focus on creating an image with a text overlay, using a quote as an example.
Image Lessons Article Series
Image Lessons is a mini-series within Lorelle’s WordPress School to teach you the very basics of how to create and modify images for your WordPress site.
- WordPress School: Image Lessons – Introduction
- WordPress School: Header Art Images
- WordPress School: Text on Images
- WordPress School: Call-to-Action Graphic Images
- WordPress School: Screen Capture Images
This is a tutorial from Lorelle’s WordPress School. For more information, and to join this free, year-long, online WordPress School, see:
- Lorelle’s WordPress School Introduction
- Lorelle’s WordPress School Description
- WordPress School Tutorials List
- WordPress School Google+ Community
- WordPress Publishing Checklist
- How to Give Feedback and Criticism


6 Trackbacks/Pingbacks
[…] « WordPress Lessons: Header Art Images […]
[…] WordPress School: Pageviews WordPress Lessons: Header Art Images […]
[…] on creating images for your WordPress site, we’ve covered the basics, experimented with two ways of creating header art from scratch and with text overlaying a photograph, and learned how to put text on images for […]
[…] helping you learn how to create and use graphic images in your WordPress site, we’ve covered header art images, adding text overlays to images, and made a call-to-action graphic with a link wrapped around it, […]
[…] WordPress School: Header Art Images […]
[…] WordPress School: Header Art Images […]