For my genealogy blog, I have two types of contributors: the living and the dead.
Yes, you read that right.
The living are those who contribute to the blog’s content with articles, stories, and information, and they are the “living”. They are issued passwords and authority to do specific things within the blog to contribute to its production. I will talk more about the responsibilities and specific issues of working with the living contributors to your blog later, but for now, let’s focus on the easier group to work with: the dead.
 Genealogy blogs often feature contributions from the dead. The dead need no passwords to contribute, but they still are contributing. The dead, in this case, are authors of some of the stories and poems we want to publish and they need to get the credit and attribution they deserve.
Thus, I have some authors who just happen to be dead, but they still need a byline on my genealogy blog.
At first this seemed like an easy concept to grasp. In WordPress, as blog administrator, I can just add them to the author’s list and then select their names in the “Post Author” box on the Write Post panel page. Right?
Of course not. Nothing I do is that easy. After all, how many people have dead authors on their blogs? Huh?
Creating a Dead Author Profile
In WordPress, authors and users are required to provide specific information in order to register to contribute to a blog. They must provide a nickname, their name, a password, and, oh, yes, an email.
That’s right. My dead authors need to have email addresses.
For some blogs, in order to “finish” your user access, an email must be sent to a valid email address and inside of the email is a link which, when clicked, completes the registration process. Without it, no access or use of the author’s name on your blog. Thus a valid email address is required.
I decided to use my own. Though that decision was not as simple as you might think. I have several family members helping me with my genealogy blog. If the author belongs to one of the other contributors, we can use their email address in place of an email address for the dead person. After all, if someone wanted to contact the person about what they are writing about or for more genealogy information, then they would have to talk to a living person, right? That’s the thinking. It’s just a matter of deciding which dead author is which living person’s responsibility.
The password and rest of the information was easy. I just have to remember what the passwords are for all these dead people, because they certainly aren’t much help in that area. You expected a little dead humor on this, right?
I filled in the information for the dead user, listing nickname, first name, last name, my email address, and the biography under author description.
But wait! I want people to know that:
- These people are dead.
- When they did live when they were alive.
In genealogy, dead people speak to us all the time and our research allows their voices to be heard. In a genealogy blog, we not only share their stories but we need to date them. Dates let us know when they did the speaking and gives us more information about the time period in which they spoke and wrote.
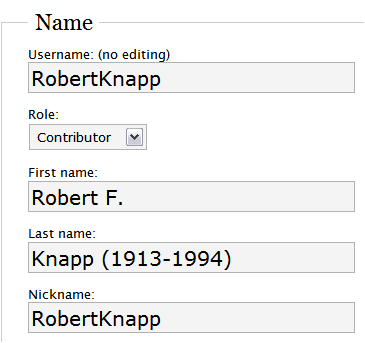
In the Users > Authors and Users > Add Users panel, in the First Name form box, enter the first name and middle initial. For Robert Francis Knapp, this separates the Robert F. Knapp from the rest of the Robert Knapps out there.
In the Last Name box, I put in the last name and the years of their life such as Knapp (1913-1994). This helps others know which Robert F. Knapp in which century is writing – excuse me – wrote – this document, story or poem.
After entering the basic information, hit ADD USER.
Next, you need to assign authority to the user. Click the tab for Authors and Users and put a check mark in the box for the dead user. In the section below, select Set the Role of checked users to: and choose Contributor. This adds the user to the Post Author box on the Write Post panel and gives them little other authority to mess around with our blog. You can also set this user level authority from within the EDIT USER panel.

We need to do a little more editing and add information in the User Profile panel. Click EDIT to access it.
Move to the section that says Display name publicly as: and choose the full name layout.

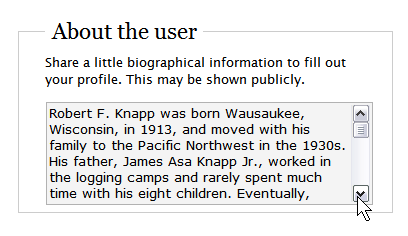 In the About the User section, enter in a biography for the contributor.
For your information, currently, links, HTML, and paragraphs (ignores line breaks) are not permitted in this box, so don’t try to use them. It will only accept text as one lump block. This information will appear within your WordPress Theme if your Theme is set up to display such information. We’ll talk about creating custom author and category pages on your WordPress blog later.
Do include helpful genealogy information about the user like his or her parents, where they were born and died, and something about their life.
It is also very important to include the attribution or credit stating that permission has been granted to publish this information by the family or whoever gave permission. You can do this without naming names, if privacy is an issue. If it is, I usually say “permission for publication granted by the heirs and estate of X”.
Since your dead author probably doesn’t have his or her own website, in the Website/URL section of the form, add the link to the author’s “page” on your blog. For most WordPress blogs using permalinks, it looks like:
http://example.com/author/username/
For my blog, posts by Robert F. Knapp are found at:
http://www.cameraontheroad.com/family/author/robertknapp/
When done, click UPDATE.
 When you post a story, poem or article by this user in the Write Post panel, from the Post Author box you can select their name to set their byline. If the WordPress Theme does not show authors on posts, you might want to add the author template tag to the WordPress Theme. If you have set the template tags to reproduce the biography and other information in the single post page view and/or customized author template file, this information will be there automatically.
Adding Living Users to Your Blog
The process of adding living contributors is the same. In this case, however, the password is sent to the email address of the living and, depending upon the authority given to the user or author, they may be able to change that password. It is up to you to set what level of authority the person has and what access they have to your blog. The process works the same.
There are times when you may have a contributor to your genealogy blog who is not computer savvy, and, in fact, doesn’t have an email address. For these living contributors, use the dead author method above and leave out the years of their life, unless you want to leave it open ended. Then you can put (1945 – present) after their name. They still require an email address, so like a dead author, it’s either your email or another contributor to your blog.
Whether or not your contributors are living or dead, you can still easily add them to your blog.
Genealogy Blog: Building a Blog Series
- Starting With a Purpose and a Plan
- What’s the Difference Between a Genealogy Blog and a Normal Blog?
- Who, What, Where, and How Questions for the Plan
- Determining What Features I Want in My Blog
- The Blog Budget – How Much Does a Blog Cost?
- Genealogy Blog: The Fast Method of Setting Up a Blog
- Genealogy Blog: Choosing a Blog Title and Domain Name and URL
Site Search Tags: genealogy, genealogy blog, building a blog, blog building, blog contributors, contribute, contributors, dead, death, dead authors, author, authors, user levels, users, authority, permission, access, blog access, blog authors, blog contributors, living, family history, genealogy authors, blog management, blog, blogging, blogging tips, wordpress, wordpress tips, wordpress authors, wordpress contributors, user level permissions
Copyright Lorelle VanFossen, member of the 9Rules Network


5 Comments
Very interesting idea! Now I have to see how I can implement that into my family blog.
Great series on Genealogy blogging. I haven’t decided yet, if I want to go the blog route, but I’ll be sure to check back if I do.
Thanks for the info!
Hi Lorelle,
Question: – having added said new (live) contributor, what code should I litter my template with to ensure their name (linked to their website) appears as author of their post. I currently don’t include the snippet because it’s just me and would prefer not to litter all the (pre)existing posts with my name…
Muchas gracias
Bill
On your WordPress Theme, where you want the author byline link to appear, use the the_author template tag. And please, put your name on EVERY post you are the author of. It isn’t littering. It is respect, it is credit, and it is SEO necessary if you want to be associated with your blog. People aren’t visiting every page on your blog. They are visiting one or two and they need to know the person behind the blog.
Make sure each new contributor sets the way their name should appear on their posts in their Settings Profile so it doesn’t say “admin” or “contributor” or “Smith, Fred” or “honey bear cutie pie” or whatever their user name is. 😀
I have really enjoyed this series and I am glad that I came across it. I am wondering what tools did you end up using on your family blog, I looked at it and I was inspired to add my genealogy research into a blog. The main problem that I have is that my genealogy software that I use exports all my data into 1500+ html files or a single XML file but I am lost as to incorporate this information into a wordpress blog. I really dread having to re-enter all this research information all over again to make it work for worpress… any ideas?
Thanks!
11 Trackbacks/Pingbacks
[…] Blog Contributors – Wanted Dead or Alive […]
[…] Blog Contributors – Wanted Dead or Alive […]
[…] Blog Contributors – Wanted Dead or Alive […]
[…] Blog Contributors – Wanted Dead or Alive […]
[…] Blog Contributors – Wanted Dead or Alive admin 31 August 2008 Firefox Extenisons, WordPress Themes, WordPress Tutorials Firefox extensions, Tutorials, Video Tutorials, Web Developer Toolbar, WordPress, WordPress Themes, WordPress Tutorials Hello world! […]
[…] Blog Contributors – Wanted Dead or Alive […]
[…] Authors: Showcasing the Authors to find the one that most meets your needs. See also, “Genealogy Blog: Blog Contributors – Wanted Dead or Alive” for tips and techniques for add deceased authors to your WordPress family history […]
[…] Genealogy Blog: Blog Contributors – Wanted Dead or Alive […]
[…] Blog Contributors – Wanted Dead or Alive […]
[…] Genealogy Blog: Blog Contributors – Wanted Dead or Alive […]
[…] Genealogy Blog: Blog Contributors – Wanted Dead or Alive […]