 I’ve just finished five years of teaching non-stop college and community education workshops and programs on WordPress for beginners, novices, experts, web designers, web developers, web programmers, and those who think they know everything but still realize they have a lot to learn. I love that last group as they are willing to learn and grasp everything with both hands and a foot.
Along the way I’ve learned a few things about WordPress, too. I’ve learned how people use it, abuse it, torture it, and get frustrated when they apply their preconceived notions to the publishing platform.
Many years ago I saw a sign that read something like:
Battling dragons is easy.
It’s stepping in chewing gum that brings me to my knees.
Over and over I find people grasping the big picture aspect of WordPress. They understand SEO (write like a human and use nouns not pronouns). They quickly understand that social media is just another term for networking and marketing. I’m delighted how quickly most of them get that choosing a WordPress Theme design is about studying the bones of the design and the features, not the paint job.
What surprises me most is how often the chewing gum breaks them.
Yes, over the past year, WordPress.com’s new interface has brought many users to their knees with frustration. That’s not what I’m talking about. I’m taking about the little tiny things that people bang their heads against.
So let’s talk about them.
WordPress is a Giant Form for Data Entry
Whatever you think about WordPress, know this: It is a giant data entry form.
Everything you add to WordPress, each word in the content, the site title, tagline, the time zone, content and settings in Widgets, your profile, everything goes into a database to be stored. How that data is generated and displayed on each web page of your site is the true magic of WordPress.
With functionality in the core of WordPress, along with some special coding by the WordPress Theme and Plugin developers, requests are made to the database to extract that data and display it within the site’s design and structure.
Garbage in garbage out applies to any database, WordPress included. Learn how to publish well and ensure the data going in is clean and easy for a WordPress Theme or Plugin to work with.
Know that everything you add to the database may not appear on your site. What appears is dictated by the WordPress Theme features and functionality, it’s customizable options, and influenced by WordPress Plugin features and options. I’ve had many students stress when losing header art or something else they worked so hard on. “But I put it there!” They learn that the WordPress Theme they changed to doesn’t offer that feature or functionality, or requires them to set that option again.
If everything you enter and set in WordPress goes into a database, consider changing WordPress Themes to see what happens. The content stays the same, only the design and design elements change. Be less fearful about switching Themes.
When you think about WordPress as a giant data entry form, it takes a little of the mystique away. Hopefully, it will also take some of the fear away.
The Kitchen Sink: Toggle Toolbar
I had an odd debate with a professional web designer about how she didn’t like teaching her clients the HTML to add headings and color words. “WordPress’ visual editor offers only the very basics and they don’t want to learn HTML just to blog.”
Confused by her argument, I realized she never learned how to use WordPress, just design for it. She didn’t know how WordPress worked right out of the box. I teach my college students that the most important thing they can learn about WordPress is how to use it like a user, like one of their clients. If you can’t show them how to use what you design and develop for them, what use is it?
The more you learn about what WordPress can do without whizzbang Themes and Plugins, the more judicious you are about adding those features and functions.

To add headings, color text, and add other formatting options on the WordPress Visual Editor, look for the last button to the right. If this is a self-hosted version of WordPress, WordPress Plugins may have added more buttons to the end of the toolbar, so look for the one with dots in boxes, meant to represent the single row and double row of the toolbar.
Formerly called the Kitchen Sink button, the Toggle Toolbar adds a second row filled with formatting options. Headings are under the dropdown that says “paragraph.”
On this bar you will also find the Paste from Word or any word processor or web page button. Use it, or switch to the Text/HTML editor when pasting such content.
A measure of caution here. Just because you have these options, doesn’t mean you should use them. A little spice can go a long way in a recipe, but too much spoils the whole dinner.
Display Name
To set the display name, the name displayed on the front end of the site as the author, commenter, etc.:
- On WP-Admin, go to Users > My Profile > Display Name.
- Set it to a human sounding name.

Why?
Two key reasons. First, it changes the front-end representation of yourself on the byline, author profile, and in comments (and your Gravatar profile) to a human sounding name rather than a company name, spam name, or username. It’s ugly and unprofessional seeing a post published by abc982g2 as the author. Second, among the information necessary to access your site is your username. Hide it when you can.
WordPress Themes use the author display name in many different ways. It appears on the byline, in the post meta data, on author pageviews, and in the comments. Personally, I can’t stand replying to someone with a username as their comment name, and we shouldn’t. Talk to us like we are real people not advertising targets.
Write Your About You: While you are on the My Profile screen, take a moment to write a one to three sentence description of who you are and what qualifies you to write and publish what you do in the About you section. This information will appear on some WordPress Themes in the post meta data section under a post and on the author pageview at the top. It may also be featured in some profile Widgets.
- WordPress School: Your Profile
- Blog Exercises: Your Byline
- Manage My Profile – WordPress.com Support
Site Date and Time
“I published the post. Where it is? It’s not on the front page? What did I do wrong?”
It’s there, it is just scheduled.
While rare, when the current time doesn’t match the site’s date and time, you may publish a post in the future and not see it until your current clock passes whatever time zone your site is set to.
Related to this is when someone notices in the post meta data that the publish time is several hours off from when they actually published it.

To set the date and time for where you are, or where you wish to be when you publish:
- Go to General > Settings > Timezone.
- Select the appropriate time zone for the Universal Time Clock. Note that UTC and local time are displayed to help you.
- Save Changes.
- General Settings — Support — WordPress.com
- Setting Your WordPress Blog Clock – Lorelle on WordPress
- How to Change Date and Time Format in WordPress
Site Title and Tagline
Set during the initial setup, often hidden by the header art option to hide the site title and tagline, people forget that the site title is set for “Sally’s Blog” instead of the revamped official site title of “Dancing in the Moonlight,” or whatever. Search engines see it, but visitors don’t.
Many also don’t set the tagline or don’t understand it. WordPress used to have it say “Just another WordPress blog,” but now they have left it blank because it is often not filled in.

The Site Title is the name of the site. It can be anything you wish. Search engines pick that up as the title of the site displayed in their search results.
The tagline is the definition of your site, a statement that clearly defines or teases the reader on what the site is about. Usually it is used to clarify the site’s purpose. “Dancing in the Moonlight” could mean many things, clarified by a tagline that explains, “Life after retirement can be your best living,” or “My wilderness hot springs adventures.” Same site title and two completely different definitions and reader expectations.
To set both:
- Go to General > Settings.
- Set the Site Title and Tagline.
- Save Changes.
You may change these at any time as your site evolves without impacting the site’s domain name and url. These do not change those.
Blog Picture/Blavatar/Gravatar
For a few years, the blog picture was called the Blavatar, a twist on Gravatar. Now it is called the Blog Picture/Icon and we miss the old joke.
![]()
The blog picture is an image that represents your site, not you. On WordPress.com, it is used in the Reader (feed reader) as your site’s brand or identity, as well as elsewhere throughout what is slowly becoming a networked community.
It also becomes your site’s favicon, the graphic that appears in web browser tabs to visually identify your site.
![]()
To set the Blog Picture:
- Go to General > Settings > Blog Picture/Icon.
- Click Browse to select a image file. Square JPG or PNG images are the two acceptable formats.
- Click Upload Image To add it to the Media Library and select it as the Blog Picture.
- You will be able to crop it to the square shape after uploading.
- Once complete, it may take up to 24 hours to appear on browser tabs and other places, though often it takes minutes. The delay is usually due to browser caching.
A Gravatar is the image that represents you as the author of the site. It is managed by Gravatar, owned by Automattic, and integrated into all WordPress sites.
![]()
A Gravatar image is linked directly with your email address. When you use that email address in WordPress comments, your Gravatar image is generated and featured next to the comment. If that is your main email for your site and set in your Users > My Profile, it also appears at the bottom of posts you’ve written and published on your site in the post meta data section as the author image, if your Theme supports it, and also on author pageviews, again, if the Theme supports it.
Gravatar also offers a profile page and a feature on WordPress sites to display your Gravatar profile when your name as the author link is hovered over or used as the Gravatar profile Widget in the sidebar or footer areas of the site.
If you do not have a Gravatar profile and image, you may add one through WordPress.
- Go to Users > My Profile > Gravatar.
- Create your Gravatar image and fill in the profile.
- Set the Rating: If you set anything but G, the image may not appear.
- Complete the process and return back to the WP-Admin when done. It may take up to 24 hours for your Gravatar to begin to display, though usually less time.
You may have multiple Gravatars for different email addresses, and change your Gravatar image at any time, much like you would a Facebook profile picture.
Yes, you may use the same image for the Blog Picture and Gravatar, or they may be different.
Both the Blog Picture and Gravatar images are used in a variety of ways and sizes on a website. Ensure that the image you upload is clearly visible and identifiable at 300 pixels as well as 16 pixels.
- WordPress School: Blavatars – Lorelle on WordPress
- WordPress School: Gravatar – Lorelle on WordPress
- Blog Exercises: Gravatars
- Gravatars – WordPress.com Support
- Gravatar Hovercards – WordPress.com Support
- Gravatar Profile Widget – WordPress.com Support
- Adding Avatars and Gravatars to Your WordPress and WordPress.com Blog – Lorelle on WordPress
Category and Tag Management
 WordPress organizes your content using taxonomy, a method of categorizing your content. Unfortunately, WordPress doesn’t do this automatically. You have to do it manually.
Understanding the difference between categories and tags continues to confuse people. Here is the most simple explanation I can give, and it is well practiced.
Think of your site like a book.
You open your refrigerator and find you have one eggplant left and it is about to spoil. You turn to your cookbooks and pull out a book. Where do you look for a recipe to cook your eggplant?
You look in the index, right? You want a list of all of the recipes with eggplant in them.
You take another look at the cookbook and realize it is dedicated solely to aubergine, the proper name for eggplant. Now where do you look for a recipe?
You look in the table of contents. Why? Because your priorities have changed. You need to decide what type of meal you want. Do you want Baba Ganoush? Look in appetizers. Maybe moussaka? Look in Entries. Need a side for your main meal, then you would look there to find something to do with the eggplant, right?
Both ways of cataloging and grouping content works, each serving different needs.
Categories are your site’s table of contents.
Tags are the index words.
Many people confuse tags with keywords as part of SEO. While they are a part of the whole, and tags and categories may be keywords in that sense, think of these based on the premise: How can I best help my readers find related material?
Keep your main categories to 5-7 in number. You may have additional subcategories. Make your categories the big grouping of your content, such as WordPress Tips, Photography Techniques, and Recipes.
Category names are not the time to get cute. People won’t click on “My Thoughts,” “Babble,” or “I’m Talking Here.” They will click to see what your expertise is on a subject.
Make tags anything you wish, keeping the names down to four words max, generally. You may use as many as you wish, but WordPress.com users need to know that any more than about 12 may prevent your post from appearing in the Reader as WordPress.com has decided only spam sites use that many tags.
Tags are the words people would use to search for this specific content. For this article, the keyword would be what? Among the choices would also be the names of the categories the post is in. Think about it and compare your thoughts with the words I’ve used. You will find the tags in the post meta data section at the bottom of the post.
Categories are displayed in WordPress in widgetized areas with the Category Widget. They are also found in the post meta data, displayed near the post title or at the bottom of a post or Page.
There are many things you need to know about how WordPress handles tags and categories. This isn’t the post, but I’ll have reference links below. Here are a few things you need to know:
- Categories and Tags are combined in a single database table on WordPress. If you name a tag name first, such as apple, then add it as a category later, the slug in the URL (the pageview name) for the category becomes apple-2. You can change this by deleting the tag and the category and then adding the category back, then add the tag, and the tag will become apple-2. Note that WordPress developers say they have fixed this issue but it persists.
- In general, keep tags all lowercase or title case for a clean tag cloud or list. Note that if a tag name is added as a category first, the tag name will be capitalized. Edit the tag to change the case.
- Don’t add categories as you go. Plan for them. Think the process through and revisit your categories after six months, then a year, then two years of blogging to clean them up. My professional rule of thumb is that no category should exist unless it has a minimum of 25 posts to justify its existence.
- Do Not Use the Dropdown Option for Categories: This hides the categories and makes the user work to see and explore them. Few Themes design for this so the dropdown form tends to look cluttered and dated.
Edit Categories
To edit categories, to change the names, delete, or add a description to a category, go to Posts > Categories.
Hover over the category name to access the options.
If you cannot delete a category, it is set as the default category. To change the default category, something everyone should do immediately upon setting up WordPress to remove the Uncategorized category:
- Create the category you wish to be the new default through a post or Posts > Categories > Add New.
- Go to Settings > Writing.
- Change the default category and save changes.
- Go to Posts > Categories.
- Find the former default category and delete it.
Note that all posts in the deleted category will automatically switch to the default category, though in some cases will have no category. Go to Posts and scan down the list of posts to find which posts have no categories.

To add a category description, often featured by many WordPress Themes on the category pageview:
- Go to Posts > Categories.
- Hover over a category and select Edit.
- In the description form, write the description. You may use a properly formed HTML link to add links to the description such as mentions of other related categories or tags, or a post or Page for more information on the topic.
- Save changes.
- WordPress School: Categories and Tags
- WordPress School: Category Names
- Adding, Deleting, and Changing a WordPress Category
- Are You Uncategorized?
Edit Tags

Do you know what this person is talking about?
Tags are displayed also in the post meta data section at the bottom of each post or near the post title, these help direct the reader to related content that might help them even more.
A tag cloud works like a heat map, displaying tag words larger or smaller based upon the number of posts with that tag. Be aware that each tag is a unique word. It does not take into consideration plurals or alternative spellings such as wordРress tip and wordРress tips. You will need to use one consistently or both to cover your options.
Rarely will you need to edit or delete a tag. Usually it is to fix capitalization or spelling. Over time, you may find that a tag cloud with mixed capitalization feels like clutter and wish to change all of the capitalized tags to lower case.
To edit or delete a tag:
- Go to Posts > Tags.
- Search or scan for the tag you wish to change.
- Hover over it and select Edit.
- Make changes and save.
- WordPress School: Categories and Tags
- Blog Exercises: Spell Checkup on Categories and Tags
- Tags and Tagging in WordPress
- Tags Are Not Categories – Got It?
- WordPress School: Category Names
WordPress Pages and Posts
WordPress has three core content types:
- Pages
- Posts
- Custom Post Types
Custom Post Types should really be called Custom Page Types, but that’s how naming often goes in WordPress. These are customized content that integrates into the site to meet the needs of the site owner and designer. They could hold ecommerce content, portfolio materials, or a wide variety of content and act independently of the default structure and organization of posts and Pages in WordPress, though they may share their taxonomy.
Few people will ever use a Custom Post Type, so let’s focus on the details of Pages and posts to help you understand how WordPress uses them.
Pages are timeless content.
Posts are timely content.
Your content is timeless no matter where it sits in WordPress. What I’m addressing is the issue of how content is displayed on a site right out of the WordPress box.

By default, posts are displayed in reverse chronological order on the front page of the site as well as multiple post pageviews (web pages featuring more than one post such as categories, tags, and search).
In WordPress, Pages (with a capital P to distinguish them from web pages – yes, I know, dumb) exist outside of time. They have no date orientation, no chronology.
Pages are displayed in the primary navigation and through the Pages Widget.
Posts are displayed on the front page in reverse chronological order or on the Blog if the front page is set to static. Posts are grouped by categories and tags.
Pages may have subPages in a hierarchical order on the main navigation. Posts cannot have subposts, but they can be in subcategories.
Pages hold “timeless” content, as in content that exists outside of the reverse chronological of a site. Typical Pages are About, Contact, Subscribe, Policies, Events, Gallery, etc.
Posts are timely content such as the latest news, a new tutorial, fresh commentary, your articles.
It can be challenging to decide what is a post and a Page, and my student and clients fret often over this point. Should an article on the best skate boarding parks in Portland, Oregon, be a Page or post? It depends. If the site is all about skate boarding, it is a post. If the site is dedicated to skate boarding in Portland, then it might server the author and the readers to be a Page, serving as a reference guide.
The key thing to know about Pages and posts is that when you update your site, posts go into the feeds and trigger email notification for your followers and subscribers. Pages do not. You can update a Page as often as you like but it does not trigger a notification or alert to followers of your site.
- WordPress School: Posts and Pages
- Blog Exercises: Page and Post Abuse
- Are You Abusing Your WordPress Pages – and Your Blog?
- WordPress School: Pageviews
Which Widgets?
Widgets often confuse new users of WordPress. First, it is a stupid name. I was among many who found the name, and was rewarded with the honor of subtitling them “sidebar accessories.” WordPress Widgets are still accessories to your site, modular features added to widgetized areas of your site, still mostly confined to the sidebar and footer, though a few WordPress Themes are starting to pay closer attention to what “widgetized” means. After all, a widget could literally go anywhere, so let it.

Most people start out with the widgets that come with the Theme and some of these are not appropriate to keep.
The core Widgets that most sites need are:
- Search
- Categories
- Tags (Cloud)
- Pages
If the WordPress Theme has a search bar incorporated into the header area, and you tend to publish long form content, why not add the search to the bottom of the sidebar or in the footer for those who do make it to the end of a web page so they don’t have to scroll up.
Categories are your site’s table of contents, so display them. Help the reader find the topics you cover and let them know they are in the right place with the person who knows the answers to their questions. Set the category list to display with the hierarchy of categories and subcategories and NEVER display them as a drop down. This hides the categories and makes the reader work to access them.
Tags are less important to display as they are featured in the post meta data section of every post, but they still offer insights to the visitor about the topics you cover. By default, the tag cloud is set to 75 words. Drop that to 25-50 to clean up the clutter such a long cloud of words creates.
Pages are normally featured at the top of the site in the main or primary navigation, but the navigation may be customized, excluding or arranging some of your key Pages in drop down menus. Ensure that the key content on your site is available somewhere in the sidebar or footer with all your WordPress Pages.
From there, the WordPress Widgets you choose are up to you and the needs and goals of your site. This may include images, email subscription, follows, social media integration, whatever you wish.
What NOT to include in your sidebar or other widgetized areas are:
- Archives: Archives are the monthly categorization of your content. When was the last time you visited a site and thought, “I need to find that article they wrote in 2013, in May I think it was.” The only use for archives is to brag about how long you’ve been doing this, or help you, the site author, find the content you remember when you published. Many think this helps people read a site in chronological order. It doesn’t. Even if they click on a monthly archive link, the content is still presented in reverse chronological order. If you wish to have people read your site in a specific order, create a Page called “Reading Order” or “How to Read the Site” and use one of the archive shortcodes to display a list of posts in reverse order, or manually create a list of links to the reading order.
- Meta: The Meta Widget features set links to help someone log into the site via the front end, and links to your feeds. If you need to create a front end login, do it better. If you are the only one on the site, learn how to type “login” at the end of your site’s address to access the login and remove the clutter from the sidebar.
- Links or Blogrolls: Blogrolls went the way of the dinosaur somewhere in the early 2000s. A link list or blogroll is a list of sites you recommend to others features in your sidebar. Unfortunately, these were long abused and people ignore them like they ignore ads with ad blindness. If you wish to promote and recommend a site, blog about it. Write a post that explains why we should visit that site and read that person. Give us reasons. Tell us what impresses you, changed your life or work, and what makes this person and what they have to say special. A link in the sidebar does nothing for anyone, especially when the list is 75 links long.
Have fun with WordPress Widgets. My favorite is the Text Widget, a Widget that opens the doors on your creativity.
- Widgets – WordPress.com Support
- WordPress Widgets: The Next Generation of WordPress Plugins
- Help and Tips for Windows Live Spaces Bloggers: Modules, Albums, Widgets, and Lists
Menus and Primary Navigation
I teach web standards in my classes and to my clients. If you are in web design and development, do the same. It is important that the standards in the industry are maintained as they are there for some very good reasons. Take time to know the laws regarding web publishing and content as well. Also, people expect a little consistency in their web experience, even if a designer or developer is still trying to break the rules.
Here are the standards for primary website navigation I found in my ongoing research for my college courses:
- Home: Home is one of those time waster links that takes a reader back to the front page of the site. In WordPress, it isn’t a “Page” but the generated front page of the website, though it could be depending upon the site model you’ve chosen for your site and the way the Theme options control the site layout. In general, it is just the front page of your site to the user. It is expected to be on the primary navigation as a breadcrumb to help them get back to the front page, but the site title and header art serve the same purpose.
- About: It is not About Us, About the Company, About Fred, or About The Site. It is just the word “About.”
- The About is created automatically in every WordPress installation with instructions in the Page content on what goes there.
- Research has found that people are finding a site interesting and when they want to know more, they type about at the end of the site’s URL to find information about the author and the site. If they get a page-not-found…
- The About is usually in two parts. The first part explains what the site is about, then a heading and content that introduces the author and answers the question: “What gives you the right to tell me?” The image of the author and/or examples of their work is often found here as well.
- Blog: Blog is only used when the site model features a static or dynamic front page and the blog content is separated from the front page. This is becoming an old style site model, but does continue for sites wishing a splash or introductory content on the front page.
- Policies: Every business, professional, non-profit, or government site requires site policies, also known as terms of service or usage. At a minimum, they include copyright, disclosure, privacy, liability, and comments. These may be presented on a single Page in WordPress titled Policies or Legal, or in a series of subPages depending upon the length of each policy.
- Contact: Contact is one of the most critical Pages on a website. It features instructions and a contact form for contacting the site owner or authors.
- For a brick and mortar location, it may include the address, maps, and directions as well.
- It should NEVER include an email link for your own security and safety. Email links are also painful for people to use as they must copy it and paste it into their email program, or click and risk installing Outlook Express or another email program on their computer, thus scaring them. Use a contact form. The form is sent by email to you, and preserved under Feedback in WordPress (if using the Jetpack WordPress Plugin or on WordPress.com). This gives you the opportunity to screen all contacts and when you reply, you provide your email address as part of the process.
You may include other Pages such as Subscribe, Events, Gallery, Resources, and so on, and even add categories to the primary menu to highlight that content.
The web standard order for the primary navigation is:
Home, About…Policies, Contact
If you have a separate blog, it is:
Home, Blog, About…Policies, Contact
The order is important. Research has shown that the right and left sides are the most viewed by most languages, so you put your most important navigation links at the edges, and whatever else in the middle. Remember, these are not structured as to what is important to you but to the reader.
The design of the primary navigation menu in a WordPress Theme is also critical to understand and respect. Very few Themes permit multiple rows on a primary menu. Dropdowns, yes, but not dropdowns that drop, drop, drop, drop, and then drop some more, moving the user right off the screen.
The real estate property of the primary menu is not just limited, it is precious. Make every word count. This is why the standard is About and Contact, not About Us and Contact Us. Too many words.

How not to structure a primary navigation menu.
Also understand that by default, all Pages are added automatically to the primary menu in WordPress. If you are working with a static site model, every web page is a Page, thus added to the primary menu. This requires exceptional skill to organize and structure such menus. Use the Appearance > Menus feature to control your menus.
- Custom Menus – WordPress.com Support
- WordPress School: About Page
- Tips For Writing Successful Policies – ClarkWP Magazine
- WordPress School: Posts and Pages
- Blog Exercises: Site Policies and Bloggers Code of Ethics
- Disclosure: It’s Your Responsibility – ClarkWP Magazine
- Blog Exercises: Protect Your Privacy
- Blog Exercises: Comments Policy
- Copyright: How to Quote and Cite Sources – Learning from Lorelle
Media and The Media Library
WordPress stores uploaded images and documents in the Media Library. Many users get excited about starting their site and begin by uploading all the images they need to the Media Library first, before creating the posts and Pages that hold that content.
While this isn’t a rule breaker, it does cause some complications. Before we get to that, let me address some basics for new users.
- No Drag and Drop: While you may drag and drop an image file from your computer’s file manager into the Visual Editor in WordPress, and it will upload to WordPress, you cannot select content on a web page or on a word processing document or pdf and drag and drop it into WordPress and expect it to be pretty. It won’t work. You must upload the image file first to WordPress and then embed it.
- Image Preparation: Images should be prepared before uploading to WordPress. Why? Because they are often in a raw format or huge, consuming server storage space and making for slow downloading times. Images must be resized to an appropriate size for use on the website, set as an optimized JPG file, and renamed to a readable file name, not DCM9127834892.jpg.
- Image Size Matters: Images should be uploaded at the maximum width you anticipate using them as. Generally, lovely photographs are uploaded between 800 and 1600 pixels max width. From there, WordPress allows you to resize them to fit into the content. Remember, you can always resize an image down, but never up. If you upload an image that is 100 pixels wide, do not expect it to look good at 1000 pixels.
 Alignment Matters: So many don’t take time to align the images they embed into their content. By default, there is no alignment, so the images sit along the left margin looking lost and broken. Learn how to align the images to the left, right, and center. Research has shown that images aligned center and right tend to get more attention than those aligned left where people expect words, and images on the left interrupt the reading process. Images aligned left in or near lists also tend to break list structure.
- Galleries: With the help of the Jetpack WordPress Plugin, collecting all the great features of WordPress.com for self-hosted WordPress users, you have access to some beautiful image gallery options. Use them. Have fun with them. Galleries may be added to Pages or posts, and you may have multiple galleries on a single web page in WordPress.
Understanding how images and media work in WordPress is a little confusing. Let’s simplify it.

When uploading images to a post or Page, take time to go through all of the Attachment Details featured to the right of the image thumbnails. Add the following for SEO as well as legal reasons associated with the Americans with Disability Act and similar global legislation.
- Title: The title is the title of the image. WordPress imports the file name. If the image file is named properly in a short title with spaces, not dashes or underlines, it will appear as the title of the image in the form. The title is used as the page tile on Attachment Pages.
- Caption (optional): Not all images need you to speak for them. They don’t need captions. “This is a red rose” isn’t helpful when we can all see it is a picture of a red rose. Let the images speak for themselves. I direct students and clients to only use captions when an image must identify the people within it, a place, it requires explaining because we don’t know what it is, or it isn’t your image and it requires a citation to the original copyright holder and source.
- Alt Text: Alt Text or Alternative Text is a description of the image for the visually impaired. The description should be a concise sentence that describes the image to someone who can’t see it. This is required for commercial, non-profit, and government websites by international law.
- Description (optional): This used to create a text file with a longer description of an image for the visually impaired for images that required such descriptions. Today, WordPress uses the description to create post-like content on Attachment Pages.
- Alignment: Use the alignment. Don’t just dump images into your content. The choices are left, right, center, and none. Use “none” sparingly. If you use right or left, ensure the image size is set small enough to allow the text to wrap to the left or right of the image. If you use center, ensure the image is as wide as possible to ensure it fills the width of the column.
- Link To: This is critical. There are four options under Link To: None, Media, Attachment, and Custom URL. If this is an image and available as a larger size for closer inspection, always use Attachment. If this is downloadable media, use Media. If you do not wish a link around the image or file, use None. If you wish the image to be a call-to-action, a clickable item to take the visitor to another web page, use the Custom URL.
- Size: Choose the size carefully. Remember, you can always resize an image down, not up. Rule of thumb: If an image is aligned left or right, set the size to 60% or less of the content column width. If the image is aligned center, set the size to full.
The term media is inclusive of documents, pdfs, mp3s, video, as well as images. When uploading images to a post or Page, which also means to the Media Library, the term media refers to downloadable items when using the Link To feature in the Attachment Details.
Confused?
When you upload an image, you have an option to set the Attachment Details to create a link around the image for viewing a larger version. When selecting “media,” the linked image displays on a blank web page. When selecting “attachment,” the image displays at the larger size on an Attachment Page, a Custom Post Type in WordPress. This is the preferred choice as WordPress displays the image within the context of the site with the site navigation, branding, etc., there with the image, and even a place for comments on the image.
Check it out on any of the images I’ve embedded in this post. All are set to none or attachment.
If you wish to upload a pdf, doc, mp3, or other downloadable media, set the Link to to media and a link will be created to allow someone to click or right click and save and download the media file.
The rule of thumb to remember:
Set images always as none or attachment. Set downloadable media as media.
Another tip is to always upload images through the post or Page Edit screen rather than directly to the Media Library. When you do so, it “attaches” the images to that post or Page. When working on that post, you can set the drop down in the Add Media screen to display only the images attached to that post, which makes it a little easier to find what you are looking for if working with many images on a single post. You can attach images to a post or Page through the Media Library, but that takes an extra step.
- WordPress School: Images
- WordPress School: Image Preparation
- WordPress School: Image Lessons
- WordPress School: Call-to-Action Graphic Images
Featured Images
Featured images confuse many WordPress users, including professional web designers.
Featured images are what were once called post thumbnails, but they are more than that. They are images that represent a post’s content. Pages have featured images, but rarely do WordPress Themes use them.
WordPress Themes use featured images differently. If you are using featured images on one Theme and switch Themes, that Theme may use them differently or not at all.
The expectation of featured images is that when added through each post or Page Edit screen, the image will appear to the right or left of the post’s excerpt on the front page and other multiple post pageviews in WordPress. Not true. It might appear above the image, next to it, or not at all, and there might not be an excerpt as that might be set manually by the author.
The popular Twenty-Eleven WordPress Theme is a great example of the possible uses of featured images.
- Featured images on Twenty-Eleven are not used as post thumbnails and do not appear on the front page or multiple post pageviews.
- If the featured image is set and is the same width or wider than the suggested header art, it will replace the header art on that post or Page.
- If the Showcase Page Template is used on the front page of the site, and a post is set as sticky, and the image is the same width or wider than the suggested header art size, it will display in the slider at the top of the front page as the background image behind the post title.
Changes your perspective on how featured images are used, doesn’t it?
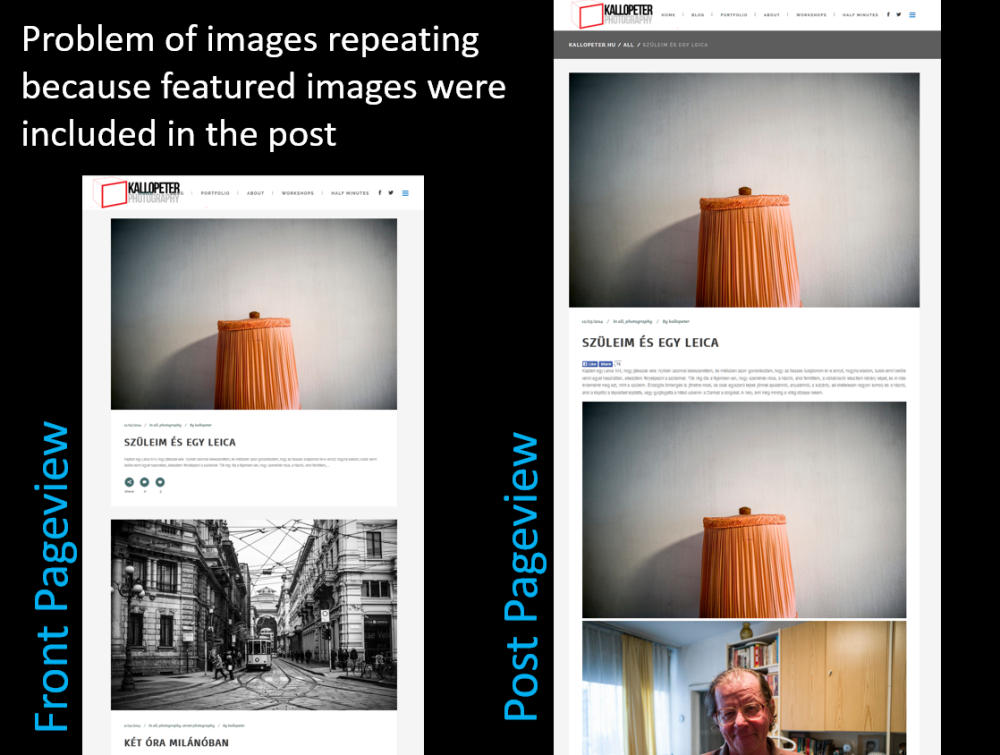
One of the problems facing many using featured images is the duplication effect or the lack of the same image on the post itself. The featured image is uploaded and attached to the post separately from the images in the post content.
- The image maybe visible on the front page of the site, but not on the post itself.
- If used in the post content, the image might be visible on the front page, and also featured at the top of the single post pageview, and in the post content as well, creating the duplication effect, displaying the same image on the same web page twice.
Read through the instructions and details on a WordPress Theme to discover how it uses featured images. Learn how they are used and take that knowledge into account when you publish. Check the demo and preview your site as well. If you are looking for a WordPress Theme with featured images, include that in your Theme search.
Don’t Let WordPress Themes Own You
Are you owned by your WordPress Theme? Did you pay for it and now feel guilty when you think about dumping it for something else? Are you force feeding a WordPress Theme because you think it owns you? Seriously?
For those new to web publishing, I recommend you stick with free WordPress Themes for the first year. You are still new to this. What you think you need in a web design is often an assumption rather than a true desire. Work with the free Themes for a while and keep lists of what you like, don’t like, and wish it would do but doesn’t. Study other sites and learn how they do what they do. What do you like, don’t like, wish your site would do or not do?
With experience comes the knowledge of what works and doesn’t on a WordPress Theme. Then research the Themes and look at the bones, not the colors and paint job. A WordPress Theme is not a template or skin. It is the HTML architecture overlaid with the CSS design specifications, supported by web programming that makes it whirl, click, and spin to make your site look the way you wish and work the way you need. It works for you, it doesn’t own you.
Feel free to quit a Theme if you don’t like it and it isn’t working for you. It takes seconds to switch, and maybe a couple of minutes to rearrange a few Widgets to get it the way you like. Experiment. Use the Theme preview and their demo sites to explore how a site works. Look at all the various WordPress pageviews such as the front page, search, categories, tags, etc. Study the difference between how the front page of the site looks compared to a single post pageview. Are they the same or different? Look at the bones. You can also change the paint job.
Over and over again people come into my classes and workshops complaining about a WordPress Theme, and asking for a recommendation on a perfect Theme. I even hear from professional web designers starting to work with WordPress that they get familiar with a specific WordPress Theme and use it for every client, not taking the time to really understand the bigger picture of how the Theme works and doesn’t work. Professionals, make or use a framework Theme and don’t buy into the cult of a specific Theme. It’s part of being professional.
As for the others, there is no perfect Theme. Not all Themes work for every website. Take your time. Look at the bones. Learn enough about how to use the WordPress Customizer or to edit CSS just a little to make a WordPress Theme your own.
- Blog Exercises: Ingredients of a Professional Site – Lorelle on WordPress
- The Ingredients for Good Web Design – Zero Zen Design
- Successful Website Design: The Main Key Ingredients – Joshua Paul Design
- The Essential Ingredients of Effective Nonprofit Web Design – Best practices, tips and fundraising ideas for nonprofits – Classy
How Often to Publish?
With Google changing their secret sauce algorithm and letting out the tips and tricks to get found through their search engine, then SEO “experts” advising you on the “right way” to run your site for maximum exposure to search engines and readers, I hear many myths and assumptions about publishing frequency.
In 2006, I started an experiment with several of my sites to determine the best time and day to publish. What amazes me is that the original findings haven’t changed in ten years.
There are two answers to this question.
First, publish when you have something to say and publish. Don’t rush something because you are up against an artificial deadline. When you have news, when you have something worth sharing, share it. We’ll wait for you.
Second, if you are publishing regular content, publish it before your audience hits their feed reader or arrive at your site.
Consistently, I get the highest traffic Monday – Wednesday, with a boost in the weekend but not much. The majority of the traffic arrives about 8AM PST, which makes it morning across most of the United States, though evening throughout other parts of the world when people get home from work and hit the web. Thus, I publish between 4-6AM PST on Monday or Tuesday in order to catch the attention of the majority of my visitors and fans.
This might not apply to you, so check your stats and monitor them for the days of the week and times in those days when your visitor numbers peak, and plan accordingly to be there when they stop by for a visit.
In WordPress, you can control this using the Schedule, Timestamp, or Future Post feature.
- On the Post Edit screen, look for the Publish modular box on the right. For those with the new Calypso interface, it maybe a hunt as they keep moving it. Look for the date and time to publish.
- Where it says Publish Immediately, click Edit.
- Adjust the time and date to when you would like the post to be scheduled. Please note that if you are working in December or January that you ensure you check the year, too.
- Click Okay to set the date and the Publish button will turn to Schedule. When ready to publish the post, click the Schedule button.
When working with clients, it is important to help them understand that their site doesn’t have to own them. They are in control. They can sit down and write and schedule 10 posts and have them release once a week, twice a week, or whatever they wish over time. I’ve written six weeks of posts and walked away from my site while traveling, checking in only for comments during that time. Clients love this.
As for feeding Google, the secret sauce doesn’t like dead and inactive sites. So keep them active. What does that mean for you and the needs and goals of your site? It could be once a day, once a week, once a month, three or four times a year. It is up to you, just don’t let your site sit inactive for more than six months. It’s sad and lonely and we like happy blogs.
- Schedule a Post — Support — WordPress.com
- Working Ahead – Future Posts with WordPress – Lorelle on WordPress
You Publish Posts Not Blogs
I don’t know who started it, but I want to end it.
A blog is a website. A blog is a collection of posts. You do not publish blogs, you publish posts.
Blogging is publishing on the web, and that includes what you do with Twitter and Facebook, often called micro-blogging.
I’m all in favor of an evolving language, but it is frustrating to sit with a group of people and have one talk about the blogs they publish, only to make us think that they manage multiple sites. They don’t. They have one. If you have many, that’s cool, just be specific when you say that you publish many posts across all of your blogs.
Learn to Use the WordPress Text Editor
If I may leave you with one lasting bit of help, it is to learn to use the WordPress text editor.
Much ignored by WordPress developers, this is the heart of publishing a post. The more you learn the basic HTML you need to publish a post, the CSS to align and place an image properly, the more control you have over your content’s presentation. The more you learn how to present your content well, the more readers appreciate the effort, willing to wade through every word you say and examine every image you upload.
This begins by learning to use the Text Editor.

Don’t fear it. Dive in. Click the option to the Text or HTML editor bravely. You will see that it offers clean presentation of your content with a few HTML tags to present a bold, italic, list, link, and image. Learn these. They are your weapons, the tools you need to know to publish with courage.
Years ago I did a test to compare the time it takes to publish a post with the Visual Editor compared to the Text Editor. There is no doubt that I’m fast at what I do. I’ve been doing it for over 30 years, but the visual editor slowed me down by double, sometimes triple the time it took me to use the text or html editor. I was surprised. You would think that the WYSIWYG visual editor would make the process faster. It’s familiar to those using word processors, right? Not.
I fought with image alignment. I played scavenger hunts for buttons instead of typing a few keystrokes to make something bold or italic. Everything took longer.
Now, someone knowing nothing more than the visual editor probably moves faster, but after six months of frustration, I went back to the text editor and I’ve thrived every since.
One of the biggest delays and frustrations I find with the Visual Editor and new WordPress students is the fact that the Visual Editor is WYSIWYMG not WYSIWYG. The former is “What You See Is What You Might Get.” Recently a photography and WordPress student emailed me, tears fresh on the email, unable to align two images next to each other for before and after examples. We talked through the options and all was solved with a little HTML and CSS in the text editor and he was happy.
Preview Your Posts Before Publishing: Don’t depend upon the Visual Editor. Always preview your posts before you hit publish. Check image alignment, ensuring the images are bumping into each other or crowding the text. Check that you’ve added the post to categories and tags, and not forgotten the title. Look for broken links, add headings, and put lists into HTML lists to look clean and nice and help the reader read your lists easier. Viewing the post preview, you also catch misspellings and grammar errors faster than you might in the WordPress Editors.
Learn your tools. Know how all this stuff works. Learn how to use your web browser and how the most popular ones work. Learn basic HTML. I’ve got a week series of lessons to help that start with WordPress School: HTML and CSS Tutorial, and there are many places online offering contextual, video, and online classes for free or low fees to help you learn just the very basics you need to know to do this stuff better and wiser.
You don’t have to become a programmer or web developer. You learned how to control a steering wheel, blinkers, brakes, gas pedal, and windshield wipers to drive a car. Talk about complicated learning that requires coordination – and you didn’t have to learn how the engine worked, did you? Some of us did, but you get my point. Learn a enough HTML to drive your site well.
- WordPress School Tutorials by Lorelle VanFossen
- WordPress Publishing Checklist
- WordPress Site Structure and Organization
- The Basic Structure of a Blog Post – Learning from Lorelle
- The Giant Blog Exercise Check List Part 1
- What You Must Know About Writing on the Web – Learning from Lorelle
- What You Most Need to Know About WordPress


17 Comments
Great resource! These are all the most important things you taught in your class. I’m kind of left wondering if this means you will not be teaching anymore?
Thanks!
I will die before I stop teaching. LOL! These are just lessons learned and shared after an intense five years of working with novices and experts, and finding they have much in common when it comes to stepping in gum. Thanks.
some mistake in this sentence of yours: [If you can’t show them out to use what you design and develop for them, what use is it?]
Thank you dicegeorge. Much appreciated.
Good Day to You Lorelle,
How wonderful to find you talking about mistakes when setting up a WordPress site, when I happen to be in the process of creating my second WP site right now.
Not only is “stepping in the chewing gum” so sticky, but there seems to be no end to the trouble we can get into. Not only that, but now we have the new “Customize” design. This transition is very confusing. Especially, dealing with the difference in “My Domains” and managing the MX records for email.
That’s my current “stick”. “This too will pass.”
Then again, “Customize” is wonderful when trying out different themes. It seems almost every time we change to a new theme, adjustments need to be made.
We can play around customizing, putting the widgets back in the side bar (I keep a list in a Word doc for that), or playing with fonts. Checking each page, or enough of them to make sure the formatting still works.
If we can’t get the theme we are trying to work the way we want, just exit out of the Customizer without saving, and nothing has changed on the old theme. Nice!
I never realized there is a “Paste from Word” function in the toolbar, even though I always have it visible. In Google Chrome, we can select “paste as plain text” in the mouse right click menu. This seems to do the same thing as pasting from a text document, but we don’t lose all the formatting, just some of it. Is there a difference between the two methods?
Thanks for giving a “heads up” about not using our login name as our display name. Doing this leaves the door wide open for the “bad guys”. If they don’t know our user name, they have twice the trouble getting in our “back door”.
I’m sorry you feel that Blogrolls are “dinosaurs”. I have found many uses for them on my current site, and plan to continue using them on the new one. Breaking up the sidebar with image widgets helps make them more appealing. They help me overcome my lack of skill with HTML. Having Glaucoma makes using code very difficult and easy to mess up. Being creative with the Blogroll can really help with this. Blogging 101 at Blogging University still teaches about and encourages the use of Blogrolls. I even posted about them after adding them to my site. I don’t like seeing them used just to show “blogs I follow”, which seems to be the original purpose of the Blogroll. It can be used for so much more. Poor misunderstood Blogroll Widget!
Thanks for taking the “Feature” concept out of the term “Featured image”. Now I understand why they act so funny. I only tried using the feature once. The result shocked me into never doing so again. Thanks for explaining all the different tweaks.
Wow, you really like the HTML editor!
I’m considering taking the Blogging 201: Customizing class at Blogging University. The next class is in April. Your classes look interesting as well. For now, I’m going to concentrate on the “basic” WordPress skills and what already works well for me, just because there is too much else to deal with at the moment.
It’s nice to know you’re here with more helpful learning experiences, when we are ready. Your recommendations and advice will be taken into account as I proceed with building my new website.
You’ve also helped me make a choice between a “static” home page and a “blog”. The key to my decision is “Current”.
My Best to You
Arthur Strout (Arth)
Let’s see if I can help with your questions.
1. Paste from Word and the right click option available in some browsers to paste text only are the same.
2. It is not my opinion that Blogrolls are dead. It is a fact. WordPress has even removed the Blogroll/Links Manager/Links feature from time to time, but people use it for non-blogroll activities so it remains due to their protests. Usage of the blogroll for design and structure is not a good use. This is you imposing your desires and needs upon your readers rather than designing and developing a site for their desires and needs. Visual impairment issues are ones that I did not specifically address, but do know that there are many browser tools out there to help overcome those challenges on the web without imposing a blogroll in the sidebar. 😀 If Blogging University is still promoting blogrolls…blogrolls and blogs I follow are the same thing. Seriously, you want to promote a site to your readers, blog about them in a post, don’t clutter up your site with a list they won’t use.
3. The HTML or Text Editor in WordPress is a tool. I do not like it. I learned to use it and my productivity increases, so I keep using it. It is so sad that it has become the forgotten and ignored child of WordPress development, but it still serves a vital purpose.
Thank you for the kind comments. They are much appreciated.
Good Day to You Lorelle,
Thank you very much for taking the time to address the concerns in my comment so thoroughly. You are very much respected and appreciated. I value your insights and experience.
The way that you share an insider’s view gives us a rare chance to understand confusing issues with a different perspective. You are indeed a wonderful educator.
You bring up some interesting points regarding Blogrolls.
I have saved all the emails from my Blogging 101 class. The email that talks about Blogrolls is:
“Day Ten: Build a Better Blogroll”
The email encourages us with:
“Today’s assignment: Create a blogroll to share a few links you love.”
I will be happy to forward the email to you if this would help.
The email seems to include a few different types of widgets. My blog post also talks about them, the ones I prefer to use and how they are used.
If I’m understanding you correctly, the “Blogs I Follow”, “Links” and “Text widget”, would all fall under the same “Blogroll” category.
Possibly, you may make an exception when we talk about the “Text widget” because we can also use HTML with it (I don’t use HTML).
I agree with you that giving a mention in a post with a link to the site being promoted is best.
One use for the “Links” widget that has been helpful to me and my visitors, is to provide a special group of links to a series of Twitter help articles. In this way the resource remains visible, long after the blog post no longer is.
I feel three is a difference between “promoting” and keeping useful resources visible in the side bar. Keeping resources easily accessible, speaks to the more positive and useful function of the sidebar and blogroll.
I want to share this with you because you remind me of a very good friend of mine. He feels about DOS much the same way you do about the HTML or Text Editor.
Back in “the day” when our computers were running on Windows 3.1, we had to rely on using commands in DOS, to do many things that we now do without thinking about in our modern version of Windows.
For those who are not of our generation, DOS is the operating system that Windows itself depends on, just to load and much more. Microsoft now owns the DOS operating system and has completely incorporated it into Windows. When you see the screen with the black background and all that digital information streaming by at boot-up, or when you bring up the “C:” prompt window, you are seeing DOS.
Our computers are easier to use through the “point and click” or “touch screen” in Windows.
For most of us who don’t deal with HTML or Style Sheets, using the WYSIWYG (what you see is what you get) word processor like tool in our WordPress Dashboard, is just easier.
It seems that both the HTML editor in WordPress and DOS in Windows are both the useful but “forgotten children”.
One thing we can agree with it seems is that our sidebars are useful. There are a few themes out there with no sidebars, but not that many. The majority of themes have them, including yours.
I am curious about what you feel would be an alternative to the sidebar widgets, collectively referred to as “Blogrolls” here.
Perhaps this is a bit unfair, because I’m not looking for an answer that requires editing a style sheet or using HTML.
Isn’t WordPress designed to be “user friendly”?
It seems that perhaps the real issue with Blogrolls, is not so much the tool we choose to use, but the purpose with which we use it.
I suggest that this is more a matter based on our individual skills, and our freedom of choice, depending on our preference.
I’m looking forward to taking the Blogging 201 Customizing class in April.
I don’t believe it will change my preference in my choice of tools, but will provide me with a valuable knowledge and more freedom of choice in managing my blog(s).
That’s a wonderful concept and you are a wonderful conversationalist.
Rather than add a response to my “comment spam heads –up” below, I’ll just thank you for your response here.
Glaucoma causes me to be quite color blind when it comes to distinguishing shades of the same color spectrum.
My apologies for missing the links for contacting you.
Now that you have made me aware of the location, I have found your “Contact” link in your sidebar, next to the “About” link.
Thank you for your patience!
My Best to You
Arth
Thank you for the offer for more information on blogrolls, but no thank you. After over 30 years of blogging and as an industry pioneer, I only regret it when archaic lessons are taught to new entrants into the world of web publishing, but don’t let that stop you. Keep going. It is an evolving and ever-changing industry.
As for WordPress Widgets, when you use the blogroll, called Links in WordPress with accompanying widgets, you are creating a list of links to share with others. They could be on a variety of topics. I’ve used this feature for many reasons, none of them to link to sites I recommend as I saw the futility in that early on.
The widgets for “Blogs I Follow” shares the sites you’ve added to your feed reader. Since you may add a wide variety of sites, some you might not wish people knew you followed, take care with sharing such information on your site. Also note that most people tend to have the same blindness toward these as they do advertising. Unless they know why you follow and recommend sites, they aren’t interested as the links are out of context.
The text widget is a favorite of mine and has nothing to do with blogrolls, though you could stuff it full of links.
As for a list of references, resources, and specific helpful recommendations, like your Twitter tutorials, if you specialize in blogging about Twitter and serve as a resource for Twitter tips and techniques, that would be nice, but it is better to create a Page (as in WordPress Page) or post with a listing of those tutorials with your reasons for recommending them. As a Page called Resources or References, it could highlight that content better than cluttering up your site.
I also recommend my series on the Blog Herald from years ago on WTF Blog Clutter: Out-of-Control Blogrolls. I did an ongoing series on blog clutter that might interest you on that site. As for the value of sidebars, I believe they are valuable, but they are also a dying feature. Unfortunately, trends in web design are moving to the never-ending single column scroll with no sidebars. I do hope we will not lose them completely, but as we moved from small screen to large screen and now to even smaller screens with mobile, thumbs are the way of the future for managing web navigation.
I was building computers in the early 70s and well remember DOS. Thanks for the historical visit. 😀
Keep going with the learning, and maybe take a few minutes to go through my WordPress School tutorials and Blog Exercises to help you with your new and improved skills.
Thanks!
Good Day to You Lorelle,
To say that I’m impressed is an “understatement”!
Up until having this conversation with you, I have considered the folks at Automatic to be the absolute authorities on “everything WordPress”. For anyone following this conversation, Automatic are the original creators of WordPress.
A while ago I read all your posts on how to deal with someone who is violating our Copyright, by posting our content elsewhere without permission. The information seemed so overwhelming at the time, but understandably so.
It seems there is a lot more to WordPress, than what we see on the surface.
You are not only a wonderful educator, but so helpful as well!
As I’m reading your latest response in this conversation, a new folder in my “Favorites”, called “WP Help” is being filled with all the pages you have linked to here.
Consider me a convert!
Instead of waiting to take the “Blogging 201” class, I’m going to start going over your instructions, a little bit at a time (wish I could structure more time, but learning Affiliate Marketing properly is a bit overwhelming and time consuming).
Thank you for helping me realize why the side bar is becoming less popular. I like the new Twenty Sixteen theme and use it on both my sites. So much for trying to be “up to date”. You are causing me to rethink a lot of ideas.
I will be interested to see if you decide to do anything with your theme in the future. The thought gives following your blog, tickle my curiosity. I agree with you about wanting to keep the sidebar. The smaller mobile screens do a good job of dislocating them though. My smartphone makes mine into more of a footer.
I like your suggestion to create a page called “Resources or References”. That would look great on the main menu! I already did a post called “Blogroll Anyone” that goes into detail about why I recommend those Twitter Instructional pages. In fact that’s when I got started on Twitter.
“Out-of-Control Blogrolls” looks like an interesting series to read. It is so distracting to visit a page, only to be so distracted by the flashing images and other content. Most of the time they are doing a “hard sell”. I never could stand to stay on one long.
In the mid-80s, I purchased my first Tandy computer from Radio Shack and took adult education. It helped me get out of the mail room and into the Secretary of State, Bureau of Corporations, here in Maine.
The education and your efforts to set us straight are much appreciated!
My Best to You
Arth
Just to clear up somethings you say as I’ve been involved with WordPress, yet I am not an employee, since 2003.
Automattic did not create WordPress. It was created originally by Matt Mullenweg and Mike Little, then by literally thousands of people including myself since May 2003. It is free and open source code, thus open for all to help make it better.
WordPress is not “owned” by Automattic. WordPress.com is “owned” by Automattic in that they own the trademark, domain name (it was given to Matt many years ago by someone else), and they oversee the web hosting with WordPress Multisite.
WordPress is “owned” (still not the right word – overseen) by the WordPress Foundation. Yes, Automattic employees and non-employees (volunteers) work together to develop WordPress and do so much more. There are community events and activities such as WordPress Meetups and WordCamps, documentation, overseeing the WordPress Plugin and Theme Directories, translations – trust me, it takes more than a village of people to make WordPress happen and many of the people working on it, like me, do so as volunteers.
As for copyright issues, I wrote “What to Do When Someone Steals Your Content” many years ago and it continues to serve today. WordPress.com must comply with DMCA requests (to deal legally with copyright infringement) as do all web hosts. WordPress.org and the WordPress Foundation have no control over how people use their installations of WordPress as they are not web hosts.
I recommend that you start using a feed reader like Feedly instead of bookmarking and favorites. I think it will soon become a favorite tool as it brings the web content to you instead of making you go get it.
As for learning Affiliate Marketing, you are not allowed to do that on WordPress.com, so why learn? The average time spent working on affiliate marketing is something like 20 or more hours a week. The average annual income is like $1000, which breaks down to pennies a day. Too much effort with too little to learn, and if you aren’t putting yourself fully into it and know the ins and outs of soliciting business and advertising and marketing…just blog your passion and call it good enough and find other ways to make money. I’ve watched too many people think it is a get rich quick deal and it isn’t.
As for my Theme, like Mr. T is a prisoner of his bling and Mohawk, changing Themes will take some work and warning to my fans. LOL!
The flashing and hard sell…you are talking about Blog Herald? Yeah, they went the way of the dark side after I left. I worked for them for many years as an author.
Tandy! We had a Commodore then I built a TR-80, then…oh don’t get me started. I’m on a Microsoft Surface Pro 4 right now and it is the most fun I’ve ever had with a computer. Love where this technology is going and don’t want to go back to going to get a cup of tea and a walk around the block to wait for a web page to load days.
Thanks again and I do hope that I’ve been able to help you a little on your journey on the web.
Good Day to You Lorelle,
I find myself a bit overwhelmed and very concerned by something you said in your last reply:
“As for learning Affiliate Marketing, you are not allowed to do that on WordPress.com, so why learn?”
Over the past few days the Automatic Team has helped me repurpose my Business Plan for my “Customer First Marketer” venture.
I have repeatedly told them my plans to earn income as an Affiliate Marketer.
I have created a support ticket in my WordPress Dashboard to the Automatic Team.
The URL to this post, referencing that statement is in it, asking them for clarification, regarding using my Business Plan in this way.
I told them that during our constant interactions, while helping be get past the “bugs” performing the transition, the possibility of earning income through Affiliate Marketing, being in violation of their policies never entered my mind.
Especially, because I have repeated told them my plans to earn online as an Affiliate Marketer.
I’m hoping that having a Business Plan will allow me to continue to use the new site for my Affiliate Marketing efforts.
The rest of that paragraph does not concern me as much for the following reasons:
I have spent more than 20 hours a week since retiring in November and haven’t earned any income. I have had my Business Plan on WordPress.com for over a year.
I’m no stranger to failing to earn an income online.
The majority of Internet Marketers (overall, not just Affiliates) don’t understand the concept of using social media for building relationships, not “sales”.
They don’t understand the complexities of Google Analytics (nor do I).
They haven’t found alternatives to Search Engine Optimization (SEO) that don’t involve “black hat” methods.
Understanding and implementing the concept of learning what our potential customers need, that isn’t being provided, and then coming up with an income generating plan of action is not as easy as people imagine.
Most people (including me in the past) loss courage, are unable to, or are unwilling to accept what hasn’t worked, learned from it and refocus.
Now that I’m retired, doing all these things, including failing and repurposing isn’t quite as scary (from at time consuming point of view).
Believing in ourselves is very difficult when faced with the possibility of failure. No matter how much encouragement we may get from others, only our own mindset and determination to remain positive, allows us to continue.
When we are faced with the possibility that Failing is more likely than succeeding, that belief in ourselves is very difficult to maintain.
In the case of Affiliate Marketers, doing our “due diligence” to ensure that we are offering only quality products that are popular, with a low return rate (refund rate) is extremely important.
You are absolutely correct!
Not only “Affiliate Marketing”, but many other ways of attempting to earn money online is “too much effort” with the need to fully understand what we are doing, including extensive planning.
“Get Rich Quick” deals are 99.9% scams period.
I still believe in my “Customer First” approach and hopefully, the Automatic Team as WordPress.com will agree with me after examining all the policy pages and the first introductory post I have published.
I would very much like you to understand exactly what my focus is.
The site has absolutely no sales or sales pitches there right now, because I’m just not ready to do that yet.
If you visit the site now, you will see the “platform only”, and the concept of my plan for approaching Affiliate Marketing.
I have no intention of selling myself here and out of respect for you and your readers, I will not provide a link to my site here.
I’m going to use your Contact Form to privately send you a link to my site, because I value your advice and want you to see how my concept is a different approach, unique to me.
Don’t worry about being “brutally honest” with me later in this conversation on a public level. I believe in the premise of “mutual respect” and also believe that you do as well.
Thank you again for all the time you are spending with me on this.
You are very much appreciated!
By Best to You
Arth
Good, then you are on the paid plan for affiliate marketing and have the experience to do so. Good for you.
Again, I do not work for Automattic or WordPress and they do not inform me of their activities nor policy changes beyond that I read like everyone else.
Good luck with your project.
Thanks Lorelle,
You got back to me faster than Automatic.
Knowing that you agree with that an Affiliate Marketing site is fine with the paid Business Plan helps me feel better about the policy issues.
Your support is greatly appreciated.
My Best to You
Arth
I suspect some comments are “spam” on your post.
Good Day to You Lorelle,
I was hoping to find your Contact Form and not have to inform you of this with a “Public” comment.
However, if I were having an issue with “Comment Spam”, being informed of it would be very important to me, so below is what I intended to write a bit more privately:
I want to give you a “heads up”, because of my concerns that you may be experiencing some comment spam on your post “The Most Common Tiny Mistakes Made When Setting up a WordPress Site”.
When I left my comment, it seemed to instantly be published, without seeing the “waiting for moderation” message.
I hope you find this helpful, so that you can increase your security settings if needed.
My Best to You
Arthur Strout (Arth)
My contact page is listed in the sidebar and elsewhere on the site, but I’ve included it here for you.
I’ve edited your comment to remove the comment spam references, but appreciate the intent.
Comment spam is a 26 hour a day job and I work an 18 hour day, 7 days a week. Akismet does an amazing job catching 99% of all comment spam that hits this site and the others sites I work with, but some slip through that I pick up on a regular basis. I’m sorry you saw them before I got to them. Thank you for caring so much to give it a mention.
Just so you should know, as you are also on WordPress.com, there are no “security settings” to increase. Comment spam is managed by Akismet automatically and there are no security settings for any site to improve comment spam prevention other than using Akismet and a few other WordPress Plugins. Akismet is under constant improvement and development, and it is designed to learn. By marking comment spam as spam it learns and adds those comments to its database and filters, preventing them from appearing on other sites. I’ve been involved in the battle against email, comment, and site spam since the beginning of the web, and it fascinates and disgusts me at the same time, so thank you for your diligence. I’m on top of these.
Thanks!
Hi Lorelle. I never claim to be expert at blogging in WordPress, but I love your generosity in supplying this ‘handbook’ for us. Thanks so much.
You are very welcome.
8 Trackbacks/Pingbacks
[…] The Most Common Tiny Mistakes Made When Setting Up a WordPress Site […]
[…] your blog: Common Mistakes, from lorelle.wordpress.com. This excellent page is WordPress Management in a Box: a wide-ranging […]
[…] between tags and categories and am in love with both! It all clicked for me when I read from Lorelle on WordPress that “Categories are the site’s table of contents. Tags are the index words.” This […]
[…] 24 have us looking closely at the weblog format, design, and layout. As I worked my way through “The Most Common Tiny Mistakes Made When Setting Up a WordPress Site” I tried to review the Weblog I am creating to make sure that I am avoiding common errors that can […]
[…] First published here: The Most Common Tiny Mistakes Made When Setting Up a WordPress Site […]
[…] Was wird oft falsch gemacht, wenn man zum ersten mal mit WordPress arbeitet? (engl.) Diese Frage hat Lorelle versucht zu beantworten. […]
[…] Use Lorelle’s Tutorial for additional help if you get stuck while setting up your WP […]
[…] Use Lorelle’s Tutorial for additional help with setting up your WP […]