 WordPress Plugins come in two styles: drop-in and mess with. Those are my terms, not the official ones.
Drop in WordPress Plugins are Plugins you upload, activate, and then interact with only through the WordPress Administration Panels.
Mess With WordPress Plugins are the ones you install and interact with through the Administration Panels, but they also involve editing your WordPress Theme template files, which means you are messing around with your WordPress blog.
There are some WordPress Plugins which will work from only the WordPress Administration Panels and/or through editing your WordPress Theme. Ultimate Tag Warrior WordPress Plugin is one of those, allowing you to control it’s functions through the Admin Panels, but also letting you precisely control where, what, and how you want your tags displayed on your blog.
As WordPress and WordPress Plugin authors become more sophisticated about how they write and develop Plugins, less and less editing of the WordPress Theme is done. Some WordPress Widgets allow positioning of their content around on the user’s WordPress Theme from within the Admin Panels, if the Theme is enabled to handle WordPress Widgets.
Widgets and similar non-editing of WordPress Themes will become the “better” way of doing things, but some of the best and most popular WordPress Plugins still involve editing the Theme. Especially if the user wants total control over the content and layout of their web design.
Let’s look at the basics of how to install and use a WordPress Plugin, whether is it drop-in-and-forget or a mess-with-your-theme type in this month dedicated to WordPress Plugins.
Installing a WordPress Plugin
All WordPress Plugins install in two ways. Automatic and manual.
To automatically install a WordPress Plugin, you must have the following FTP access information ready.
- Server Hostname for FTP access
- FTP Username (not the same as your WordPress password)
- FTP Password
- Connection Type (FTP, FTPS (SSL) )
Go to Plugins > Add New and enter the name or search term to find the WordPress Plugin you wish to add.
To view information about the Plugin, installation help, applicable WordPress versions, etc., click Details under the Plugin name.
To install the Plugin, click Install under the Plugin name.
When WordPress asks, enter the above access information and proceed.
If the WordPress Plugin installs correctly, the resulting screen will notify you that the Plugin is installed and awaiting activation. If you wish to activate it, click Activate. If you wish to delay, leave the page.
If the WordPress Plugin does not install correctly or fails to install, WordPress will notify you. If you wish to try the WordPress Plugin anyway, you can use the manual installation method.
If a WordPress Plugin fails to install correctly with the automatic method, be aware that there might be an issue with the Plugin and your version of WordPress, your server access, or other compatibility issues. Check the Detail page and author site to see if others have had problems with the Plugin before continuing.
To install the WordPress Plugin manually:
- Download the latest version of the WordPress Plugin to your computer.
- With an FTP program, access your site’s server.
- Upload (copy) the Plugin file(s) or folder to the
/wp-content/pluginsfolder. - In your WordPress Administration Panels, click on Plugins from the menu at the top.
- You should see your new Plugin listed. If not, with your FTP program, check the folder to see if it is installed. If it isn’t, upload the file(s) again. If it is, delete the files and upload them again.
- To turn the WordPress Plugin on, click Activate on the far right side of the list.
- Check your Administration Panels or WordPress blog to see if the Plugin is working.
From here, the process may vary.
Configuring Your WordPress Plugin
If your WordPress Plugin requires some form of configuration or set up, it will add a tab to your Administration Panels.
The official placement policy is to put WordPress Plugin tabs under Options. Not everyone obeys this. Many place their Plugin tab where it will be the most “user friendly” such as the Akismet Plugin under Comments since it deals with comments and you may be checking caught comment spam on a regular basis. Others put it anywhere they feel is appropriate. Check the Plugin’s official page or documentation for instructions on where they’ve put their configuration panel.
Following the Plugin author’s instructions, configuring your WordPress Plugin could mean setting a few options about where the Plugin’s content is to be visible on your WordPress blog or choosing which options and functions you would like enabled. Some Plugins require adding or changing the default information.
There are a few WordPress Plugins which require you to add files elsewhere in your WordPress setup. Others may require you to change file permissions, known as CHMODE, on a file or folder. The instructions in Changing File Permissions will guide you through how to make those changes.
Most WordPress Plugin authors supply fairly clear instructions on the step-by-step process to configure the Plugin. Read through these carefully. I’ve included troubleshooting tips at the bottom of this article.
NOTE: To see changes a Plugin makes on your blog, you will need to clear the cache (memory) of your web browser. This is called refresh. In Internet Explorer, hold down the Shift key and click F5. In Firefox, hold down Ctrl+Shift+R. This will reload the web page and clear the “memory” so you see a “clean” version of your page.
This doesn’t work all the time. Click another post link on your blog that you haven’t looked at recently if you run into problems refreshing your browser. For more information see I Make Changes and Nothing Happens.
Adding a WordPress Plugin to Your WordPress Theme
The WordPress Plugins which require messing around with your WordPress Theme aren’t hard to use. They just take some time, patience, and a little lesson in how WordPress and WordPress Themes works.
WordPress Themes are made up of template files. A WordPress Theme uses template files like modular building blocks, using only the ones it needs to combine together to build a single web page on your blog. Template files include the header, sidebar, footer, and content areas. Each WordPress template file contains code which collects information from the database and displays it on a generated web page.
Peek inside the index.php or single.php template file at the title section of the WordPress post and you might see:
<h2><a href="<?php the_permalink() ?>" rel="bookmark" title="Permanent Link to <?php the_title(); ?>"><?php the_title(); ?></a></h2>

<small><?php the_time('F jS, Y') ?> by <?php the_author() ?></small>
Inside of the h2 tag is a placeholder database request called a template tag that requests the permalink (address) of the post in a link, and then the title of the post (the_title). In the small tag, there is a request for the date of the post and the name of the author.
While the code looks overwhelming to us, the result your visitor sees is:
Title of the Article
January 12, 2007 by Alex Author Anderson
The information was collected from the database by the template tags. The template tags above are part of the core programming of WordPress. A Plugin template tag acts upon instructions from the Plugin you add to your blog, but it works the same way as regular WordPress template tags.
Some Plugin template tags are very simple, requiring only the tag set into the template file wherever you want the content to appear.
For example, if you would like to use the Random Quotes WordPress Plugin, which displays random quotes that you supply to your WordPress blog, in the spot where you want the quotes to appear, you would place the following in the desired spot in a template file:
<?php wp_quotes_random(); ?>
Some WordPress Plugins require more customization, adding parameters to the Plugin to get the results you want. The Customizable Post Listings WordPress Plugin allows you to display the most recent 10 posts on your blog:
<?php c2c_get_recent_posts(10); ?>
Want only five posts in the list, then change the 10 to 5.
The Ultimate Tag Warrior WordPress Plugin is also customizable, offering you many different methods of displaying and showcasing tags on your blog. To create a colored and variable font sized tag cloud, showing the most popular 50 tags, the UTW template tag would be:
<?php
UTW_ShowWeightedTagSetAlphabetical("coloredsizedtagcloud","","50");
?>
In the first example with the Customizable Post Listing WordPress Plugin, there was only one option to change in the parentheses. In the Ultimate Tag Warrior example, there are three parameters to change, each wrapped in quote marks.
A template tag consists of a function name and then the parameters inside of parentheses. The parameters provide instructions to the function on how it should behave.
The format for the UTW template tag is:
UTW_FunctionTitle ("formattype", "format", "limit")
The UTW_Function_Title tells the Plugin which function you want to use. The function UTW_ShowWeightedTagSetAlphabetical means you want to show a weighted set of tags in alphabetical order. UTW_ShowTagsForCurrentPost uses the Plugin function to create a list of tags for only the current post, not all the tags on your blog. UTW_ShowRelatedTagsForCurrentPost sets the function to show only the related tags for the current post, not just the tags associated with the post.
The first of the three parameters used by UTW is formattype. In this parameter you would use a string or words that instructs the plugin on the format type you wish to use. For example:
<?php UTW_ShowWeightedTagSet("sizedtagcloud","","25") ?>
The formattype tells the function for showing a tag cloud with the most popular tags at the beginning of the list, showing only 25 and sized for popularity.
To show the same 25 tags with the tag words colorized, popularity only indicated by color not by size, you would use:
<?php UTW_ShowWeightedTagSet("coloredtagcloud","","25") ?>
To show another set of the same tags, but showing 45 tags in a list rather than a “cloud”, you would use:
<?php UTW_ShowWeightedTagSet("tagcloudlist","","45") ?>
Each WordPress Plugin features different ways of controlling how it works, what it displays, and how it displays that information. Read through the Plugin’s instructions carefully to determine how to set it to meet your needs. For more information on how template tags work in WordPress, see Anatomy of a Template Tag and How to Pass Tag Parameters.
Adding the Plugin Template Tag to Your WordPress Theme
Once you determine how you want to customize your WordPress Plugin template tag, you need to add it to your WordPress Theme.
Where do you want to put it? Where you want to put your WordPress Plugin template tag is dependent upon how it works, where it works, and where you want it to go.
There are two main sections that generate a web page in a WordPress blog. The most important section is within the WordPress Loop. This is the section that generates the post content for your blog. Anything that goes into that area may be repeated on every post on your blog. Anything that goes into that area may be repeated on every post on your blog. Anything that goes into that area may be repeated on every post on your blog.
Yes, I was redundant on purpose.
If you put a WordPress Plugin template tag into the WordPress loop, depending upon the conditional statements and functions of the Plugin, it will be seen in every post on your blog. If you include a list of UTW tags for the current post within the WordPress Loop, that list will be featured on every post on your blog. If you add the WASABI Related Posts template tag to the bottom of your post content within the Loop, a list of related posts will appear on every post in your blog.
The other important section on your WordPress blog is outside the WordPress Loop. Anything outside the loop only appears once. Or so it might seem.
If you put a Plugin template tag into your sidebar, it will only be visible when your sidebar is visible. Some WordPress Themes do not feature a sidebar in the single post view, only multi-post views. Thus it will be there only when the sidebar is there.
Some WordPress Plugins require placement within the WordPress Loop. They need the way WordPress accesses information from the database within the Loop to gather their own information to display on your post.
WordPress Plugins that work outside of the WordPress Loop aren’t reliant upon it, so they can go anywhere within your blog, inside or outside of the WordPress Loop.
Adding a WordPress Plugin to the WordPress Loop
For Plugins that require the WordPress Loop, you will need to place them within the Loop.
The WordPress Loop is found on any template file within your WordPress Theme that generates post content. It can be the index.php, single.php, page.php, category.php, archives.php, etc.
The WordPress Loop begins with:
<?php if (have_posts()) : while (have_posts()) : the_post(); ?>
For our purposes, it ends with:
<?php endwhile; ?>
Your WordPress Plugin template tag needs to go within that area. But where?
The WordPress Loop typically consists of three core areas:
- Post Title and Author Information: This is the post title, author, date, and other information you want in the post title section of your post.
- Post Content: This is where your post or Page is generated.
- Post Meta Data Section: This section is where information about your post may be displayed. It might include the date or time of the post, categories, tags, author information, social bookmarking submission links, related posts, moods, or whatever you would like to complement your post.
Here is a Default Theme’s Loop with the specific sections highlighted:
<?php if (have_posts()) : ?>

<?php while (have_posts()) : the_post(); ?>
" rel="bookmark" title="Permanent Link to ">
<-- Post Meta Data Section -->
<p class="postmetadata">Posted in <?php the_category(', ') ?> | <?php edit_post_link('Edit', '', ' | '); ?> <?php comments_popup_link('No Comments »', '1 Comment »', '% Comments »'); ?></p>
</div>
<?php endwhile; ?>
If you would like to add the WASABI Related Posts Plugin to the Post Meta Data Section, you might add it like this:
<-- Post Meta Data Section -->

<p class="postmetadata">Posted in <?php the_category(', ') ?> | <?php edit_post_link('Edit', '', ' | '); ?></p>

<h4>Related Posts</h4>

<?php  related_posts(); ?>

<p><?php comments_popup_link('No Comments »', '1 Comment »', '% Comments »'); ?></p>

</div>
To add a social bookmarking site submission bar just above your post meta data section with the Sociable WordPress Plugin, you might use:
<-- Post Meta Data Section -->

<?php print sociable_html(); ?>

<p class="postmetadata">Posted in <?php the_category(', ') ?> | <?php edit_post_link('Edit', '', ' | '); ?> <?php comments_popup_link('No Comments »', '1 Comment »', '% Comments »'); ?></p>

</div>
Or possibly, you might want the Sociable WordPress Plugin to feature the icon links just below the title of your post:
<-- Post Title Section -->

<h2><a href="<?php the_permalink() ?>" rel="bookmark" title="Permanent Link to <?php the_title(); ?>"><?php the_title(); ?></a></h2>

<small><?php the_time('F jS, Y') ?> <!-- by <?php the_author() ?> --></small>

<?php print sociable_html(); ?>

Experiment with the placement until you get your Plugin’s information in the right spot. For examples of the many ways you can add WordPress Template Tags and WordPress Plugins to your post meta data section in the Post Meta Data Section on the WordPress Codex.
A Word of Warning: While moving the Plugin template tag around, take care not to get in the way of the rest of the code by placing it inside of the WordPress code or by erasing any part of the code. Just use extreme caution and make a lot of backups and notes along the way, just in case.
Adding the WordPress Plugin Template Tag Outside the WordPress Loop
For WordPress Plugins that do not have to be within the WordPress Loop, you can put them anywhere.
The most popular places outside of the WordPress Loop for displaying additional information on your blog are the header, sidebar(s) and footer.
The challenge confronting most people is WHERE in your sidebar, header, or footer to put the darn thing. Let’s start with the confusing sidebar.
Begin by viewing your blog in its WordPress Theme. Using the most recent posts option with the Customizable Post Listings WordPress Plugin, look at your sidebar to determine where you might want that list to go? Before or after your list of categories? How about after?
Look carefully at the words used in your category list or wherever you want to put the Plugin. Pick a few unique words.
In your web browser, choose View > Source or View > Page Source from the menu. In the resulting page that opens, search for the unique words in the category section. When you find them, move up to the top of that list and look for something like:
<h2>Categories</h2>
You may find a
In a text editor, open the sidebar.php template file in your WordPress Theme’s folder.
Search for the HTML identifier to find the categories list.
For the Default Theme, you will find:
Categories
This is the template tag section that creates a list of your categories. Look closely and you will see that it is in a “nested list”. Anything you add after it should also be in a list form. Our list of recent posts is in a list form, so we need to add another line to the list to accommodate the WordPress Plugin.
Categories
Related Articles
...
The Related Posts Plugin automatically creates a list for us, so we don’t have to worry about that part of the nested list.
You might want to add quotes with the Random Quotes WordPress Plugin to your blog’s header. Opening the header.php template file in a text editor, you might place the Plugin template tag just below the description section:
/">
</div>
</div>
</div>
As with Plugins within the WordPress Loop, take care and caution when placing your Plugin template tags. If you don’t like where they end up, move them to another spot.
Using CSS, you can style the look of Plugin template tag content in your style.css style sheet. If your Plugin doesn’t come with style references, you can add your own by wrapping the Plugin in a style tag as shown above with the random quotes.
Conditionalizing WordPress Plugins
Conditionalizing WordPress Plugins means providing code that makes the Plugin work or display its content depending upon the conditions at the time and the page the user is viewing.
The most common conditional statement for a WordPress Plugin is preventing it from breaking your WordPress Theme when it is turned off. Many WordPress Plugin authors take the appropriate steps when writing the Plugin to protect it from breaking your WordPress Theme when deactivated. Many don’t.
If the WordPress Plugin you are using breaks your Theme, put it in a conditional statement that says “if turned off, ignore this Plugin”.
Using the example of the Random Quotes WordPress Plugin, instead of adding <?php wp_quotes_random(); ?> to your template file, you would wrap it in a conditional statement:
<?php

if (function_exists('wp_quotes_random')) {

 wp_quotes_random();

} ?>
However, not all Plugin template tags are as simple as that. Some are set into headings and lists such as:
<li id="recent">Related Articles

<ul>

<?php related_posts(); ?>

</ul></li>
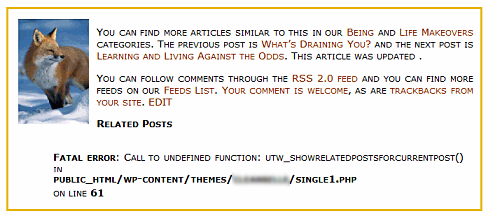
If the Plugin is turned off, the viewer would see the Related Articles heading and nothing underneath it. So the entire section must be put into a conditional tag so it disappears if the Plugin is deactivated.
<?php

if (function_exists('related_posts')) {

 echo ('<li id="recent">Related Articles<ul>');

 related_posts();

 echo ('</ul></li>');

}

?>
Plugins Appear When You Want Them to Appear
There are times when you want a WordPress Plugin to appear only on specific pages or posts. For example, you might want to only have related posts visible on single post views and not multi-post views, keeping the related posts specific to the topic at hand.
You would add a statement using conditional tags that say “If viewing a single post, display the related posts information”. It would look like this in the sidebar:
<li><h2>Categories</h2>

<ul>

<?php wp_list_categories('sort_column=name&optioncount=1'); ?>

</ul>

</li>

<?php if (is_single())

{

<li id="recent">Related Articles

<ul>

<?php related_posts(); ?>

</ul></li>

} ?>

<?php get_links_list(); ?>

<li><h2>Meta<h2>...
Let’s make this a little more complicated and add the same related posts Plugin template tag in a conditional statement to protect the Theme if the Plugin is disabled, and add it to our conditional tag that only shows the related posts when viewing a single post page. A conditional statement within a conditional statement, if you will.
<li><h2>Categories</h2>

<ul>

<?php wp_list_categories('sort_column=name&optioncount=1'); ?>

</ul>

</li>

<?php if (is_single())

{ ?>

<?php if (function_exists('related_posts')) {

 echo ('<li id="recent">Related Articles<ul>');

 related_posts();

 echo ('</ul></li>');

} ?>

<?php } ?>

<?php get_links_list(); ?>

<li><h2>Meta<h2>...
This is a bit tricky. As always take care with this and pay close attention. One forgotten bit of code and things will break.
You can learn more about how these conditional tags work in WordPress through the Conditional Tags article in the WordPress Codex.
Troubleshooting WordPress Plugins
There are five main reasons why a WordPress Plugin won’t work.
- Mizzed Spellings: When possible, copy and paste the Plugin code into your WordPress Theme. If you are typing in
UTW_ShowWeightedTagSetAlphabetical, it takes one slip of the finger to screw that up. - Smart Quotes or Curly Quotes: WordPress blogs turn quote marks into pretty, smart quotes or curly quotes, which will not work in template files. Plain text and plain text quote marks are required. Plugin authors often don’t know how to convert quotes to
"or apostrophes into'in order for them to become the “text” characters on a post that will also work inside of PHP code. Check to make sure you haven’t copied any curly quotes into your WordPress template files. And always use a text editor not word processor. - A Missing Bit of Code: It takes just one comma, quote mark, apostrophe, bracket, parentheses, semi-colon, question mark, or other bit of code to go astray and you have borked code. Be careful and check every bit of code to make sure all the pieces are there. Compare it with the original to double check you haven’t backspaced over something important.
- Wrong Plugin With Wrong WordPress Version: Some Plugin authors provide multiple versions of their Plugin for different versions of WordPress. Others create one Plugin and then never update it to work with different versions. Check thoroughly to make sure the Plugin version you are using will work with your version of WordPress.
- Conflict With Another Plugin: Not all Plugin authors hang out together and discuss their Plugins. If one person decides to name their Plugin function
functiononeand another does the same thing, the two Plugins won’t play nice nice on your WordPress blog. The same applies to variables and other functions and instructions within a WordPress Plugin. While they do their best to keep their programming commands unique to their Plugin, conflicts happen.To determine if this is what is wrong, deactivate the Plugins one by one and test the results to see if one isn’t playing nicely with the Plugin you are trying to use. If it isn’t, then contact the Plugin author to let them know and work on a fix.
Problems happen. Bugs happen. Once a WordPress Plugin is released to the public, reports start appearing regarding problems and bugs. So check in with the official page of the WordPress Plugin for updates, patches, and fixes you may need to do, if you are having trouble with the Plugin.
How to Ask For Help With a WordPress Plugin
The number one rule for finding WordPress help is to search first. With millions of WordPress users out there, the odds are that you are not the first with the problem. The answer is probably out there. Search first. Then ask.
If you are having trouble with a WordPress Plugin that you cannot resolve, the first place to go is to the Plugin author’s official page.
I highly recommend that you stop before you go further and read through the instructions backwards. Start with the last instruction on the list and go backwards to make sure you did everything you were supposed to do. I’ve found many an overlooked step or missed instruction this way.
Read through the instructions and the comments on the page. Plugin authors should add instructions and tips made by users to their own instructions, but often they just rely upon the fixes and tips left in the comments. You may find the solution you need in the comments, so read through them carefully.
If you cannot find the help on that page, search through the blog to see if there are other posts discussing the Plugin. There, or in that post’s comments, might be the answer.
If you cannot find the answer by searching the author’s blog, before you post a question there, take time to search the WordPress Support Forums to see if someone had the same problem and came up with an answer.
If you still can’t find a solution there, search the web. Type in the error or descriptive keywords into a search engine and go down the results to see if someone found a solution.
If all that searching fails, go back to the Plugin author’s blog and ask them on the most recent post or the official Page for the Plugin.
Here are some tips to help you get a speedy reply.
- Keep the question short and to the point. They don’t need the story, just the facts.
- Do not post a long section of code for them to inspect. Do not post a long page of errors. If necessary, use a pastebin to include a link to the example code or errors from within your comment.
- Posting code in comments will mess things up on the blog and not reproduce correctly. Change all < to
<at a minimum. For more information on using code in posts and comments, see Writing Code in WordPress Posts and How NOT to Comment on Comments. - If the error or problem is still visible on your blog, make sure a link to your blog is in the comment form or in the comment itself.
- Be factual, specific, and gracious.
- Be patient. Plugin authors have a life and it may take a day or three to get an answer.
While waiting for a response, or if searching takes some time, copy the errors into a text file, and deactivate the Plugin so it won’t continue to cause problems or look ugly on your blog.
There are some Plugins which are similar to each other. If this one doesn’t work for you, look around. You might find one that does.
Here are some other resources help you with WordPress and WordPress Plugins:
- Getting More WordPress Help
- Using the Support Forums
- New To WordPress – Where to Start
- First Steps With WordPress
- FAQ – Frequently Asked Questions
- Finding Your CSS Styles
- Troubleshooting Nested Lists
- Backing Up Your Database
- The Layout is All Messed Up
- I Make Changes and Nothing Happens
- Understanding the WordPress Loop
- Customizing the WordPress Loop
- A Love Letter to WordPress Plugin Authors
- Conditional Tags
- Editing Files
- WordPress Plugins
- Managing Plugins
Site Search Tags: wordpress plugins, 30 days of wordpress plugins, using wordpress plugins, how to use wordpress plugins, adding wordpress plugins to wordpress themes, wordpress themes plugins, editing wordpress themes, wordpress loop, install plugins, how to install plugins, troubleshooting plugins, plugin troubles, plugin problem, plugin error, conditional tags, conditional statements, php, plugin installation, protecting plugins, protecting themes, wordpress themes, wordpress plugin tips, wordpress tips, wordpress help, plugin help
Copyright Lorelle VanFossen, member of the 9Rules Network


Helping you learn more about blogging and WordPress every day with help, tips, advice, and techniques for blogging and using WordPress and WordPress.com. The blogging help you need. Now.
Article Series


-

 From the World of Lorelle
- An error has occurred; the feed is probably down. Try again later.

Stop the Insanity


- Planet WordPress
- Do The Woo Community: Do the Woo is Sponsoring WordCamp Porto 2024
- HeroPress: Quieting Chameleons, WordCamp Photography, and more!
- WordPress Foundation: Apply for the Kim Parsell Memorial Scholarship for WordCamp US 2024
- Do The Woo Community: Client Relationships, AI in Agencies and Open Source with Rick McGarry and Jake Holman
- WPTavern: #116 – Jonathan Desrosiers on the Challenges and Rewards of Contributing to WordPress
- Akismet: CAPTCHA vs reCAPTCHA vs Akismet: Which is Best?
- Do The Woo Community: New Show, Open Talk on Open Source with Robert Jacobi and Courtney Robertson
- Do The Woo Community: From a Full Stack Developer to a Product Developer with Alexander Gilmanov
- WordPress.org blog: How WordPress Is Creating a Faster Web
- WordPress.org blog: WP Briefing: Episode 77: Let’s Talk About Data Liberation

129 Comments
Great article Lorelle. A couple more tips you might want to add here – things I came across by accident when running into problems ;).
1. Occasionally an installed plugin will really lead to a catastrophic failure that results in a “blank screen” when you activate it. Don’t panic. Just FTP to the plugin directory and rename the plugin that you activated. Then refresh your admin page and WordPress automatically deactivates the faulty plugin.
2. When making changes to template files before copying the modified file back over to your server, rename the original file on the server with a new extension such as “.old” (i.e if the template file you changed was index.php, rename it to index.php.old) Then copy over the changed file. That way if anything doesn’t work properly and you forget what you changed you can just rename the original file back to it’s original name and revert to the working file without fuss.
Lorelle, are you aware of any plugin that will disable all the other plugins on the WP Blog with a single click?
Many Thanks, very helpfully
Ajay – while not aware of what you are looking for a quick way to disable all the plugins on a blog is to rename the WordPress plugins folder.
Ajay, Darren beat me to the answer. Unfortunately, that action requires use and access to FTP. 😉
A while ago there was a Plugin, if memory serves, that did deactivate all WordPress Plugins with one click, but I can’t seem to find it anywhere, and it might not work with more recent versions. I’ll keep looking.
Excellent work, very thorough post. Of particular interest to me, was the section Conditionalizing WordPress Plugins. if (function_exists should be mandatory for all plugin template tags. I was going to suggest it be included in your post to plugin authors.
This is a very comprehensive and helpful article. Now my plugins won’t disappear whenever I change themes! But I’ve more or less resolved not to change my theme so frequently.
Thanks Darren and Lorelle.
That definitely didn’t strike me!
I can now go upgrade my blog to 2.1 🙂
I remember that plugin as well, but like you, memory fails me as well!
If we rename the plugin folder
what about the php code related to plugin’s ? present in the theme .
theme will hurt. this must be not a right way to do it
If you rename your Plugins folder and your WordPress Theme breaks, then two things happened, both human error:
1. The Plugin author did not make their Plugin prevent blog breakage when deactivated (which they are required now but still don’t).
2. You didn’t put your Plugin’s template tags in the IF EXISTS conditional statement (described above) to prevent blog breakage.
Consider the breaks with this upgrade a sign of the things you need to fix. Hopefully soon, all WordPress Plugins will not break your blog when deactivated.
For more on this, see When the Blog Breaks: Fixing Your Broken Blog.
I FOUND IT! I don’t know if it works, so someone please test it for me. I don’t have time right now.
Disable WordPress Plugins WordPress Plugin
I knew I’d find it somewhere under a rock. But does it work with new versions?
Hi Lorelle.
I wrote the “Disable WordPress Plugins WordPress Plugin”.
I’ve just tested it on WordPress 2.1.2 and it seems to work fine.
Excellent and thanks for speaking up. This is a great tool!
Is there a plugin that allows you to install plugins? This is useful if you don’t have FTP software. A specific case is you upload the plugin zip file and extract to the plugin folder.
HI Lorelle, great site. I am using WordPress 2.2. Downloaded the most recent copy of UTW, put the folder titled “Ultimate Tag Warrior” in the plugin folder with my FTP program. Clicked activate through word press but got this error:Plugin could not be activated because it triggered a fatal error. Any suggestions?
Turn off the Ultimate Tag Warrior?
Currently, this plugin does not work with the last two versions of WordPress. Tags are planned for the next major release of WordPress.
This article is a very helpful one.But I need some wordpress credits to Install plugins.Can U give me some.
As far as I know, you cannot use WordPress Plugins on WordPress.com blogs. As for “giving credits”, I don’t know what you are talking about. You can buy “credits” towards storage, access to changing the design of your WordPress Theme, and some other odds and ends, but I don’t know if they apply to Plugins. They haven’t for the past two years.
good job!!!
🙂
THANKS!!!!!!!!!!!!!!!!!!! I have been loooking for a simple help for wordpress, the way you wrote this was so clear and helped me so much.Wordpress is easy, but when one is new to it, it can be quite a bit of a headache. thanks!!!!
Thank you very much. My knowledge of HTML, CSS, WordPress, coding, etc. is limited to what I have read on-line in the last couple months. You made this very easy to do… I never could figure out how to install the Related Posts plugin – or anything else that had to be inserted into The Loop. Thanks!
How to use wordpress with yahoo sitebuilder?? can anyone help??
Odd place to ask. I’m sure someone has instructions. Are you talking about using one of the templates? Or using it to design a site from scratch? I’m not familiar with that, though I’ve checked out their templates which are good, but very confusing and poorly executed.
Please check the WordPress Codex for extensive information that will help you.
Thanks very much, your site is very helpful for me to understand wordpress.
hieeeeeeeeee everyone… i heard that wordpress credits can be given as a GIFTS… i came across many blogs where the moderator is conducting some contest and giving 15 credits as a gifts.. i just want to make my blog more effective… so i request you to let me know if you come across contest of such kind inorder to participate and win those credits which will be help me in improving my blog…
ThankYou..
@ bharathreddypunuru:
WordPress.com “credits” can be purchased for USD $1 each. So a contest to win 15 credits is worth $15. The equivalent of a fast food meal for two in the United States. 😀 For many, it’s better to just buy them since they are so cheap. I’m not sure what “improvements” you think will help you with your blog. The credits go to buy the CSS Extra – the ability to design your Theme from near-scratch ($15), more users, and more storage space, though we now have 3 gigs free. You can add more sidebar Widgets and do fun things with them for free, so I’m not sure what more you are looking for.
The best improvement you can make for your blog is to choose an easy-to-read design and write consistent and focused content that serves your readers and brings you joy.
Lorelle. This is great. You can probably pay a lot of money to learn this somewhere.
@ davidlind:
Installing WordPress Plugins is really very easy, and getting easier with improvements in the interface – so even 9 year olds are figuring this out. 😀
I can’t compete with young people and their computers. I was thinking about seniors like myself who are battling memory loss from time to time. Someone should write a book about seniors and blogging.
@ davidlind:
Well, it’s not a book about blogging and seniors, but check out MemoryArchive for inspiration on blogging your life.
Hey. That’s a pretty cool place. There are so many good places out here to learn the technical side of blogging. But where do you go to learn to produce good creative content? There seem to be far fewer places.
The server is down now (8am est 3/7) but I have tried to be creative and take the news and politics beyond the left/right debate that has raged for years now in my new blog NewsLinkBriefs.com. to find a place where I can somehow combine beauty and humor. The perfect marriage right? There would be far few divorces if we could get those two together on a regular basis! I need HONEST opinions whether I’m wasting my time. On a scale of one to ten. One is “Forget it”. Ten is “Time to change the Depends”. I won’t say what the number is but if I don’t get there it will be time to try something else.
If some of you could give me a number I would appreciate it. NewsLink Briefs. Hard hitting and loose fitting news.
David, are you okay? I know you are seeking attention and traffic, but this isn’t the proper venue. It’s not my place to judge your blog, right or wrong. There are blog critique services and sites that can help you. Give them a try. And good luck.
As a side note, if you are questioning yourself that much, stop. Do something that brings no inner debate and turmoil.
Hi Lorelle, you should make a topic on how to properly uninstall a plugin also.
Why? Because I had a plugin that does not unistall properly. That plugin leaves a calling to its CSS file even it is not there! I found out this error when I do a CSS validation.
Now where on earth can I delete that calling part that gives “File not found”?
Just a little crater in the blogging experience. Sorry I did my Mount St Helena impersonation in your direction 🙂
Thanks for writing such a wonderful article!
Thanks for the tips on how to configure the “related posts” plugin.
You Rock!
I just uploaded two plugins and they are not appearing in my plugin panel. I don’t know what to do. I download them to my pc. then uploaded them to my wordpress content plugins folder. They don’t appear on the plugin panel. Suggestions?
@ mrsFAB:
There are a lot of options, and the WordPress Support Forum is your first destination in the future for this kind of help.
Double check that they were uploaded to the right folder. Make sure the Plugins are properly coded so they will be recognized by WordPress (look in the Plugin file for the header). Upload the Plugins again one at a time to ensure that they uploaded correctly. Sometimes a glitch in the upload can damage a file.
Good luck.
I can’t get enough wordpress plugins….I can’t keep up with all the latest releases and updates. It’s almost overwhelming.
HI, I started using similar posts WP plugin. I think I installed it a long time ago, but I never added the: anywhere, and it worked fine, however now I want to move it, and I can’t find the: code. I’ve changed templated, etc. Did I put this in one of the ‘core’ wordpress php files? If so, where would I look now to find it. Any suggestions would be great.
@ Jason:
There are many. Some are listed in Blog Navigation WordPress Plugins: Related, Recent, Most Popular Posts and More.
this is fantastic for wordpress fan.. because i am a big wordpress fan and always check out other blogs regarding wordpress and its plugins.
thanks for sharing
can I install a plugin by using wordpress.com free host?
No, you cannot use a WordPress Plugin on WordPress.com.
Can you help me i cannnot do it!!!! I tried alot of times. please if you want to help me!!!
You are on WordPress.com. Plugins are not allowed.
very good 🙂 btw. is it possible to do the same with wordpress.com?
thanks.
You cannot add Plugins to WordPress.com. Nor JavaScript or ads. But what you can do is still amazing and that is focus on content content content content. 😀 And just blog.
This only works on wordpress.org sites
Hi Lorelle, I have been trying to install Ultimate Tag Warrior per your instructions above. The folder appears in the FTP program but for some reason, it doesnt seem to appear in the plugin section of admin section for me to activate it. I have redone this step many times and the UTW folder appears in FTP. What could I be doing wrong?
Not reading the news that the Ultimate Tag Warrior WordPress Plugin has not been supported nor is recommended to use for more than two years, especially since tags are now built into WordPress. Do not use it. That will solve your problem. 😀
Hi Lorelle
Great blog !
I installed the WP-contactform plugin and activated it. Now how can I make it appear on my page? I see it in the list of activeted plugins, but I don’t see it either in widgets or anywhere on my dashboard.
Please help
Hi Lorelle
Great blog !
I installed the WP-contactform plugin and activated it. Now how can I make it appear on my page? I see it in the list of activeted plugins, but I don’t see it either in widgets or anywhere on my dashboard.
Please help
@Bet: You’ll have to contact the Plugin author for help.
Can you tell me how to add a page to the menu? I don’t have a server and I’ve activated a couple of things I’d like added to the menu and no idea how to. I’ve tried every clickable link on the dashboard trying to find out how lol.
Can you help me? Or anyone else reading this?
I’m not sure I understand your question. I’m not sure I understand what it means to not have a server, though I think it means that you are on a “hosted” version of something for your site. I’m not sure what dashboard you are talking about, since you haven’t explained if you are on WordPress (I assume so), or Movable Type. Their Administration Panels are called the Dashboard. The Dashboard on WordPress is just one panel among many, though it does have links. I’m not helping much, but here goes.
To add a page to a WordPress blog, just click ADD PAGE from the sidebar menu in your WordPress Administration Panels. Give it a title, add some content, and save it and it will automatically appear in your WordPress Theme, the design you’ve chosen for your blog. It could be in the sidebar, in the top menu, or wherever your Theme displays “Pages.”
If you wish to add a link to your sidebar, a link to a specific page of information, then use the text widget in the sidebar and add it in HTML format, make it pretty, or whatever and it will be there.
Without more specific information, this is the best I have. Thanks.
Hi Lorelle,
I have FTP software, and I cant seem to find out how to access the server (as explained in your directions at the top of this page). It is asking me for host, username, password, and port. I dont know what any of that means. I have already downloaded the plugin .zip file, and I just want to extract it to load it to my wordpress blog.
Thanks so much.
You will need to contact your web host for that information. When you installed WordPress, if you did, you would have had to get that information from your host. Check your files to see if you did, and check with your web host if you didn’t.
Beautiful description dude. I am a beginner, but after reading this I am not feeling any more.
Thanks for this post, Lorelle. I have been so enlightened. I thought all plugins were the “Drop in WordPress Plugins” variety but now I know better. I realize that I am not yet ready and have a lot more reading to do. Thanks again.
I can’t for the life of me upload the only wire for word press plug in. I have an issue with the write permission or something regarding a setup. How do I set this up. I spent 2 hours last night and its so frustrating… I tried to do it without ftp automatically on the word press site and it didn’t work. Can someone please assist me. I Saw tons of videos and they don’t have the same issues as I do..
Here is what it says:
Unable to create directory /…blog/wp-content/uploads/2010/02. Is its parent directory writable by the server?
Thanks Rick.
Please see the WordPress Codex on how to make directories and files “writable” and the error should link to the articles that can help.
Thanks very much for helping
um… I know this might sound stupid, I have a blog hosted by wordpress and am given to believe that plugins can only be used with blogs hosted by third party hosts with access to http://ftp.. So is there no way to add plugins to a blog hosted at wordpress.com? thanks.
As the article states, Plugins are not available on WordPress.com blogs.
What’s a good FTP Software? and do i need to be paying for my site to do this or can it be an ordinary blog on wordpress.com
Thanks for article.
Hi Lorelle, thanks for the post. I’ve been trying to include a random post in my blog’s homepage using Rob’s Random Post plugin. Have already tried to make code changes inside and after the fold, as mentioned in this post.
Perhaps my problem is unique, hoping you’d be able to help – whether I add a random post within the loop or after it, I still get the latest post visible on the homepage. I only want the random post to be visible, users can refresh the page to view the next random post.
Hope you’re able to provide a solution! Best regards.
@anmol: You’ll have to talk to the Plugin author. It’s up to you to put the post wherever you want.
Thanks for telling us how to use WordPress Plugins.
Nice blog and easy to use
I don’t have the Plugins tab isn’t under Appearance why?
I need to update this article, but the Plugins tab is “under” Appearance if you have the full version of WordPress and not running under a blog network.
but how to install it on blog wordpress.com
As the article states, Plugins cannot be used on WordPress.com.
Hi guys,
I am new to this and I downloaded a theme and was trying to upload it but none of the folders in the zip file seem to work.
Which file should I upload, what should the extension look like?
Gayle
I’m not sure I can help you. To install a Theme on your WordPress blog, use the built-in Theme installation feature. Make sure you have FTP access information to your server. To download and install a Theme, download the zip file, unzip it to a directory on your computer, then using an FTP client program, copy the Theme folder to the wp-content/themes/ directory. The WordPress Support Forum can help you more with this.
I use WordPress for almost five years and must say I’ve not found a better platform for building and managing a website. Doesn’t matter whether you’re blogging, have a store front, create a massive business site or need a basic, static website to promote your services and products – WordPress can manage it all.
And te themes are not only good for personal use, but also for your clients, makes it easier to customize to there style.
thank you Lorlle i like messed up with one of my word press plug in so was having a lot of problem these days but the tips you told worked for me the problem wor of the version which i did not figure off and spend a lot of time in seeing the code and other stuff
Here are 4 more ways to install a wordpress plugin.
Hey Lorelle,
this is a pretty detailled write up that helps a lot of people. I appreciate it a lot that you have sacrificed your time to explain it!
I appreciate it even more as I write about WordPress Plugins – or more about which ones are the best. There are so many out there that it is always hard to decide on which ones to use – especially when you just start out using wordpress.
That was the main reason I started my site: I had no clue what plugins to get as there are so many and WordPress.org does not really help make a good selection…
What was your reason for starting this site?
Keep up the good work
Greetings from Germany
Hendrik
I’m glad you are joining the thousands covering WordPress. A few things to know, One, please use a blogger’s About page to learn more about who they are and why they do what they do. WordPress.com does not permit WordPress Plugins, only the self-hosted version of WordPress also known as WordPress.org. And it is a violation of trademark to use WordPress in your domain name. I do hope you will check out a WordCamp and WordPress Meetup near you to get involved with the WordPress Community. Good luck with your endeavor.
Thanks! And thank you for your valuable comments.
aaaaaaaaaahhhhhhhhhhh….. its fine but i didn’t understand this because i am beggnier of plugins
Hi, how do I find the plug-in toolbar? I’m using the Twenty Ten template, and I don’t see “Plug-ins” anywhere. Thanks!
There are no WordPress Plugins allowed on WordPress.com. Only the self-hosted version of WordPress. There are many WordPress Plugins available to use on WordPress.com. They are called “features” which is what a Plugin really adds to a site. The majority of WordPress Plugins have nothing to do with what WordPress Theme you are using. The enhance or “extend” the Theme of your choice.
thanks! Also, is it possible to edit just one page (via CSS) vs the whole theme? I have a calendar page that I’d like to show as wide as possible.
Yes, on the self-hosted version of WordPress or the paid CSS Extra feature on WordPress.com.
Hi,
This is all greek to me! Please help! I can never find the plugin under administrator on my blog. I don’t think I have it. I don’t know FTP means either or where to find it. I want to install a radio station on my blog as a widget and I don’t know how.
Please help me if you can. I hope online instructions can help me because nothing has so far. I really want to make my blog better and become any expert on this.
Thank you
It looks like you are on WordPress.com. As stated in the article, installation of WordPress Plugins and code on WordPress.com is not permitted.
The addition of a radio station widget on your site will not help improve it. These things usually are considered clutter, serving you and not your readers. Focus on the content, writing intelligent, timeless content, and serving the best intellectual food to your readers and you will be ahead of the game.
Great Article. Thanks for the detailed information. Plugins need work to effectively function.
Reblogged this on My Blog.
How do I install plugins on my wordpress free account. I do not have a server, I am using wordpress from wordpress’ server?
You cannot install WordPress Plugins on WordPress.com.
You have mentioned the very deep study about plugins and more topics on WordPress. This is my first visit to your website and bookmarked it for further reading.
[Edit – Content and Links removed due to violation of WordPress Domains and Trademarks]
OK, Im on my wordpress blog dashboard… can someone please walk me through how to install The Meetup WordPress Plugin.
Im not seeing “Plugin” on my dashboard. And I don’t know what an FTP is, or how to get into the server on my wordpress site… Please help. Thanks so much
Please read the WordPress.com Terms of Service. WordPress.com is for non-commercial sites and Plugins and Theme cannot be installed, nor JavaScript or other code used. I think you are looking for the self-hosted version of WordPress where these things can be used.
Nice article. But, since I am a nubie with wp, you are going to have to explain to me in better terms where I can put my post w/ thumbnail plugin that i have downloaded. My current posts show the pic and article, but when I throw the short code in the post, it doesn’t show the thumbnail, and also it makes that post show the other posts; like adding a post within a post. I am confused. I just want my articles to show a small excerpt, then when clicking on ‘read more’, it takes you to the actual page.
I downloaded WP Category Post List Widget. I don’t want to throw the widget in there, because it throws off everything and just looks weird. I just want it to be when a person adds a post and attaches a primary pic, that it gives that small short excerpt. Hope you understand what I am talking about.
I know it’s not helpful, but you no longer need to manually install WordPress Plugins. Use the one click install from the Plugins Panel to add new Plugins.
Follow the instructions provided by the WordPress Plugin author in the WordPress Plugin Directory (links to information in the Plugins Panel for that Plugin) and on the contextual Help areas of WordPress Plugins providing that (upper right corner of that Plugin’s option panel).
Once installed, make sure the Plugin is activated in order to work.
There are thousands of WordPress Plugins and each work differently. I am not familiar with these Plugins. Post Thumbnails are handled by the WordPress Theme, usually, so check with your Theme’s instructions. Category widgets are included in WordPress in the Appearance > Widgets. If you don’t like how they look on your WordPress Theme, either change the Theme or move the Widgets around so they look better, or use the Custom Menus to add categories to your main navigation.
For lists of the most recent posts with an except, there are a variety of Plugins to do that. Personally, I use Customizable Post Listings WordPress Plugin.
Thanks.
Hey there. Thanks for the great tutorial. I’ve heard recently that “caching” plugins are becoming very important for WordPress. I just launched a window tinting website and want to make sure my site is as fast as possible. Is there a particular “caching” plugin that I should be using? There are a few options and I can’t seem to figure out how to configure them. I don’t notice a difference in load speed. Thanks.
Reblogged this on The Destinationsco.
Reblogged this on The Philosopher's Blog and commented:
I had a little difficulty handling plugins… This is very helpful for wordpress blogger newcomers.
You cannot install WordPress Plugins on WordPress.com. Glad to help.
Please tell how can i Install word press theme in server and which FTP software is good for use?
Please check the resources and information on the WordPress Codex.
I was lost from the beginning, when you said “go to plugins”… I do not see that option on my dashboard.
I’ve had an issue with some plugins on my site, mostly my contact forms. I currently use “contact form 7” but I really want to find something that will stay static as they scroll down. Do you have any tips?
There are dozens of contact form WordPress Plugins. Other than the one that comes with JetPack, I recommend you try them out and are what works. Most are free to try.
Reblogged this on josie2intheskywithdiamonds.
i downloaded the word press zip file and i can see it on my hard drive, where do i see the add wordpress plugins please help is it on the FTP client. i have a dot tk account pls reply thanks
Please use the installer built into WordPress now or follow the instructions in this article. The WordPress.org support forums are also very helpful.
when i try to upload it say file limit exceeded in php.ini file what should i do help me ???
PHP has a 2 megabyte limit on file sizes for uploading. Talk to your web host about changing the php.ini file. Thanks.
I just installed this plugin and I am following a tutorial where it instructs me to go to Manage -> Redirection -> Options
I cant seem to find manage…. I have looked everywhere.
Here is a snippet of the directions I am trying to follow
Once you’ve done that, you’ll want to install the Redirection plugin, and make sure that under Manage -> Redirection -> Options, making sure both URL Monitoring select boxes are set to “Modified posts”. Now you can change those permalinks to perfectly SEO’d permalinks without having to do anything else, or worry about the search engine consequences.
Any suggestions?
You need to contact the WordPress Plugin author about the issue with that Plugin. I don’t provide WordPress Plugin support.
Im not seeing “Plugin” on my dashboard. And I don’t know what an FTP is, or how to get into the server on my wordpress site… Please help. Thanks so much.
Your site is on WordPress.com. There are no WordPress Plugins and no FTP available for WordPress.com.
Reblogged this on High Hempress and commented:
Having trouble using plugins?
Not all Plugin authors hang out together and discuss their Plugins. If one person decides to name their Plugin function functionone and another does the same thing, the two Plugins won’t play nice nice on your WordPress blog. The same applies to variables and other functions and instructions within a WordPress Plugin. While they do their best to keep their programming commands unique to their Plugin, conflicts happen.
Belive me… there was a mess. Best? Turning on well known plugings only
Okay.
Yes, Plugins that are not uniquely coded for IDs in their functions and variables will create a conflict. And yes, things happen, but there are ways around it. Sorry you had a messy experience.
This also happens to “well-known” WordPress Plugins. The fame of a Plugin does not necessarily guarantee its quality, integrity, or success on your site. It’s a bigger picture we have to look at. Thanks.
what are dropin plugins help with…in terms of installation?
I don’t know what dropin plugins are.
To install a WordPress Plugin, to to Plugins on WP-Admin and click Add New. This hooks into the WordPress Plugin Directory, the official source for WordPress Plugins.
To install a WordPress Plugin that is not in the directory, you will need to do so by FTP file transfer to the wp-content/plugins directory on your web server, then activate it through the WP-Admin > Plugins screen.
Hello,
1st, Thank you for such an informative site. I have been here for hours tonight and it gave me tons of valuable information. Really pleased I came across it! I have a paid for Plugin Question.
I am using a purchased plugin made made for ‘one site only use’ that I use to build/grow my 100% affiliate site via WP and Woocommerce. So I only have the one affiliate store builder plugin – license etc. I bought and like very much.
For various site behavior reasons I am thinking that maybe this plugin caught an infection of some sort. If that’s possible. I will also note that I did not add the proper security to my site prior to this issue I am having. Stupid I know – learned a valuable lesson there. I think I brought the infection on myself when I added Google Aynalytics to my footer then clicked onto a ‘Referral link’ I saw inside the GA stats area. Dumb move indeed! It was a stringer of words with dots or dashes between each word and right after i clicked it … My site was under Hit Attack! – 😦
Then installed both a security plugin (BPS Free Version) and joined Cloudflare free version and since this issue of ‘Thousands of fake overwhelming hits per day’ is still happening after a week of active security, I am thinking the infection is most likely on my Affiliate site building plugin since I have only have > Woo-commerce – Limit Login Attempts – One security plugin (the BPS free version) and my site builder plugin. Not sure where else the infection could live – in the Theme? It’s not in my p.c. -checked it myself oodles of times then by a pro to be sure. No infections on my home p.c. at all.
So, I am wondering if I could deactivate the site builder plugin by following whatever proper steps are required, then re-upload – replace the plugin with the original plugin used from my p.c. as it was not infected as a fresh plugin from day 1 install.
I am so unclear what happens to the contents – posts etc on my site when one deactivates then replaces this plugin. Do things ‘Poof’ – disappear and I have to re populate the site from scratch or am I able to keep my site as is but somehow replace the possibly infected plugin then re-activate it?
I do hope my wording made sense enough as I too am a newbie – Learning a lot but was unable to find an answer online that made enough sense to my limited skill set abilities at this time.
Any advice – thoughts or direction that you could provide me would be appreciated more than I can express. I give you a ton of credit for giving us as much as you do already and truly value your time and efforts to do so.
Kindly – Echo
Trying to understand your question.
You bought a WordPress Plugin and now you have security issues. You are worried about deactivating the Plugin and what will happen.
First, contact the Plugin author and ask. Each Plugin has it’s own ways of working. If it was the source of the “infection” or hack, which is very possible, you need to update the Plugin immediately and let the author know that it may have been the reason for a security breach, though it is hard to know as they can get through in many ways including at the server level (check your web host to ensure they are offering the best in security protection for your site).
They are the ones who will have the answers for you. Good luck and sorry about this.
how we can set view details link for custom plugin.
we can install any plugin, in admin site we can show the view details link for every plugin.
how to set the view details link for our custom plugin.????
I don’t understand. Any Plugin that offers customization or options offers a screen for setting those options. Where those are is relative to the actions of the Plugin, so you will find either a separate menu like with Jetpack, find the options under Settings or Tools, or on the Plugin screen itself for that Plugin. Read the instructions for the Plugin to learn how to use it and where they place their settings and options.
This is a whole bunch of information, for any new WordPress user.
A great website for the WordPress users, Glad I landed here. Really appreciate your work.
Lorelle, I was look for is there any automated way to detect the Poorly code plugin?
No, there is no automated way to detect poorly coded WordPress Plugins. Trust the ones in the WordPress Plugin directory over others, and check the reviews. Sure wish there was.
Its nice to see how this article is still very effective 10 years on. Good work Lorelle
Some things never change. Lol.
66 Trackbacks/Pingbacks
[…] lorelle – you will find tons of interesting things, as well as an excellent how to install, configure and use wordpress plugin […]
[…] recently posted an excellent and thorough How-To on installing plugins, little applications that expand the functionality of […]
[…] WP-Tiger-Admin-Panel – Adds a clean and simple layout to your Dashboard, making it easy to navigate. […]
[…] ?> at the place in your theme files where you want the list of similar posts to appear. Lorelle on WordPress has a good guide to modifying themes for […]
[…] Once you have installed the Ultimate Tag Warrior Plugin, go to the Administration Panels > Manage > Tags panel to set up the configuration on what tags you want where in your WordPress blog. You will also find links for more information and help. How to Install, Configure, and Use WordPress Plugins. […]
[…] for those not sure where to start, there is another helpful, related post: How to Install, Configure and Use WordPress Plugins. […]
[…] part est requise pour activer les statistiques si vous utilisées les FeedFlares sur votre blog (un lien d’aide en anglais pour savoir où placer les codes dans un thème pour WordPress), dans le cas […]
[…] here […]
[…] How to Install, Configure, and Use WordPress Plugins […]
[…] Lorelle on How to Install, Configure, and Use WordPress Plugins. […]
[…] How to Install, Configure, and Use WordPress Plugins « Lorelle on WordPress – […]
[…] ?> at the place in your theme files where you want the list of similar posts to appear. Lorelle on WordPress has a good guide to modifying themes for […]
[…] ?> at the place in your theme files where you want the list of similar posts to appear. Lorelle on WordPress has a good guide to modifying themes for […]
[…] discussed in How to Install, Configure, and Use WordPress Plugins, this is one of the Plugins which doesn’t currently feature a built-in disabled conditional […]
[…] How to Install, Configure, and Use WordPress Plugins […]
[…] ?> at the place in your theme files where you want the list of similar posts to appear. Lorelle on WordPress has a good guide to modifying themes for plugins. If you are using a widget-ready theme the plugin […]
[…] here, check Tags and Tagging in WordPress for a more complete description of tags, as well as How to Install, Configure, and Use WordPress Plugins for more plugin troubleshooting details. – Thanks, […]
[…] here, check Tags and Tagging in WordPress for a more complete description of tags, as well as How to Install, Configure, and Use WordPress Plugins for more plugin troubleshooting details. – Thanks, […]
[…] non sembra ci sia modo di far fuzionare Ultimate Tag Warrior su WordPress 2.2 (come si evince dal commento della brava Lorelle VanFossen sul suo Blog). La buona notizia è che sempre sul suo blog Lorelle […]
[…] How to Install, Configure, and Use WordPress Plugins […]
[…] these to your /wp-content/plugins folder. I’m assuming you know how to do this. Otherwise, please refer to this tutorial. Be sure to copy the entire wpng-calendar as a subdirectory of /wp-content/plugins (such that the […]
[…] How to Install, Configure, and Use WordPress Plugins […]
[…] How to Install, Configure, and Use WordPress Plugins […]
[…] How to Install WordPress Plugins […]
[…] familiar with uploading plugins to your site. Lorelle has a great tutorial on […]
[…] How to Install, Configure, and Use WordPress Plugins « Lorelle on WordPress (tags: wordpress plugin blog web2.0 blogging) Bookmark/Search this post with: These icons link to social bookmarking sites where readers can share and discover new web pages. […]
[…] How to Install, Configure and Use WordPress Plugins […]
[…] How to Install, Configure and Use WordPress Plugins […]
[…] How to Install, Configure, and Use WordPress Plugins […]
[…] surga alguma dúvida podem (devem) consultar o Codex da WordPress ou este artigo da Lorelle. Podem contar também com a minha […]
[…] How to Install, Configure, and Use WP Plugins: a great guide by Lorelle on WordPress on installing plugins […]
[…] If You are new and not really familiar how to install, configure or use WordPress Plugins I would really recommend You to read this article. […]
[…] How to Install, Configure, and Use WordPress Plugins « Lorelle on… larry Posted October 1, 2007 at 10:27 am | Permalink How to use wordpress with yahoo sitebuilder?. Here are some other resources help you with Word Press and Word Press Plugins: Getting More Word Press Help Using the Support Forums New To Word Press – Where to Start First Steps With Word Press FAQ – Frequently Asked Questions Finding Your CSS Styles Troubleshooting Nested Lists Backing Up Your Database… […]
[…] ?> at the place in your theme files where you want the list of similar posts to appear. Lorelle on WordPress has a good guide to modifying themes for […]
[…] How to install configure and use wordpress plugins by Lorelle […]
[…] (For details on installing WordPress plugins in general, see here.) […]
[…] spent a month writing over 36 posts on nothing but WordPress Plugins, published extensive tips on how to install, configure, and use WordPress Plugins and another guide for finding Plugins, “Where to Find WordPress Plugins.” I’ve […]
[…] 13. Show Top Commentators With this plugin You can display Your reader names (linked to their website if desired) and number of comments they have written right on Your sidebar! You can grab it right here! If You are new and not really familiar how to install, configure or use WordPress Plugins I would really recommend You to read this article. […]
[…] with tags I hope.Also i discovered this plugin feature that connects Zannel to Blog but still can’t understand how to make it […]
[…] they see that averagely intelligent people like me would never work their way through the complicated instructions, even if they desperately want to monetize their rather successful […]
[…] (If you do not know how to install plugins: it’s easy if you are using WordPress 2.6 or above. An option to add plugins can be found in the sidebar. With older versions, you’ll need to install the plugins manually: here are some instructions.) […]
[…] Like most simple tasks or blog alterations, with WordPress this can be done with a plugin. In my opinion WordPress is the best blogging platform for the amount of customisation you are able to do with it. For information about plugin’s and how to use them, check out this info from WordPress themselves and this how to guide. […]
[…] more detailed, read here. Related Post :blog, post, […]
[…] Check this awesome article by Lorelle for more insights on how to install, configure and use WordPress Plugins. […]
[…] WordPress Plugins come in two styles: drop-in and mess with. Those are my terms, not the official ones. Drop in WordPress Plugins are Plugins you upload, activate, and then interact with only through the WordPress Administration Panels. Mess With WordPress Plugins are the ones you install and interact with through the Administration Panels, but they also involve editing your WordPress Theme template files, which means you are messing around with … Read More […]
[…] How to Install, Configure, How to Install, Configure, and Use WordPress Plugins « Lorelle on WordPress (tags: wordpress plugin blog web2.0 blogging) Bookmark/Search this post with: These icons link to … […]
[…] you see a post containing a fully functioning code snipped widget… I’ll be relying on this post by Alex Anderson, and FileZilla, wish me luck. Share this:TwitterFacebookLike this:LikeBe […]
[…] I learned how to install a plug-in, how to upload files at a ftp program, and I’m starting to understand how to change my template […]
[…] If You are new and not really familiar how to install, configure or use WordPress Plugins I would really recommend You to read this article. […]
[…] How to Install, Configure, and Use WordPress Plugins […]
[…] How to Install, Configure, and Use WordPress Plugins […]
[…] How to Install, Configure, and Use WordPress Plugins […]
[…] How to Install, Configure, and Use WordPress Plugins […]
[…] How to Install, Configure, and Use WordPress Plugins […]
[…] How to Install, Configure, and Use WordPress Plugins […]
[…] How to Install, Configure, and Use WordPress Plugins […]
[…] There are a lot of WordPress Plugins to help you manage, control, and feature various authors on your WordPress blogs. Most of these are not for the novice WordPress users as they require heavy configuration and customization, as well as understanding how the various access permission levels work in WordPress blogs. They also include editing and changing the code within a WordPress Theme template files. For tips on installing any of these WordPress Plugins, see Roles and Capabilities and How to Install, Configure, and Use WordPress Plugins. […]
[…] Many of these WordPress Plugins for comments involve editing and modifying the WordPress Theme template files. For instructions, tips, and installation information on WordPress Plugins in general, see How to Install, Configure, and Use WordPress Plugins. […]
[…] Note: For the most part, the following WordPress Plugins involve editing your WordPress Theme template files in order to add the Plugin template tag exactly where you wish the generated information to appear. For information and tips on installing any of these WordPress Plugins in WordPress Themes, see How to Install, Configure, and Use WordPress Plugins. […]
[…] While some of these WordPress Plugins will help you change the look and layout of your blog without digging into the code, some of these will require editing or modifying your WordPress Theme template files. For tips on installing any of these WordPress Plugins, see How to Install, Configure, and Use WordPress Plugins. […]
[…] Note: For the most part, the following WordPress Plugins involve editing your WordPress Theme template files in order to add the Plugin template tag exactly where you wish the generated information to appear. For information and tips on installing any of these WordPress Plugins in WordPress Themes, see How to Install, Configure, and Use WordPress Plugins. […]
[…] For tips on installing any of these WordPress Plugins, see How to Install, Configure, and Use WordPress Plugins. […]
[…] How to Install, Configure, and Use WordPress Plugins […]
[…] Plugins which add or change elements in a WordPress Theme can be a challenge to install and configure due to the overwhelming code found within a WordPress Theme. WordPress Widgets overcome the fear as […]
[…] https://lorelle.wordpress.com/2007/02/11/how-to-install-configure-and-use-wordpress-plugins/ […]
[…] How to Install, Configure, and Use WordPress Plugins […]